Koi Fish Dresser

It’s been a couple of years since I’ve painted furniture, and this dresser has been in my garage for just as long. In true Abby fashion, I came up with a complicated design. This dresser will eventually end up in our master closet after we install an organizational system. For now, it’s in our master bedroom.

There’s a reason why I never wanted to take custom furniture orders. Because I’ve never done a piece that ended up like I pictured it. This one included. I originally asked my Instagram followers to help me choose a pattern for inside the drawers. But two days later when I went to purchase the winning pattern, the website was being really sketchy. So I ended up going with this koi pattern from a different website, Zazzle.com. I’m kind of glad it worked out that way because I love the koi pattern.

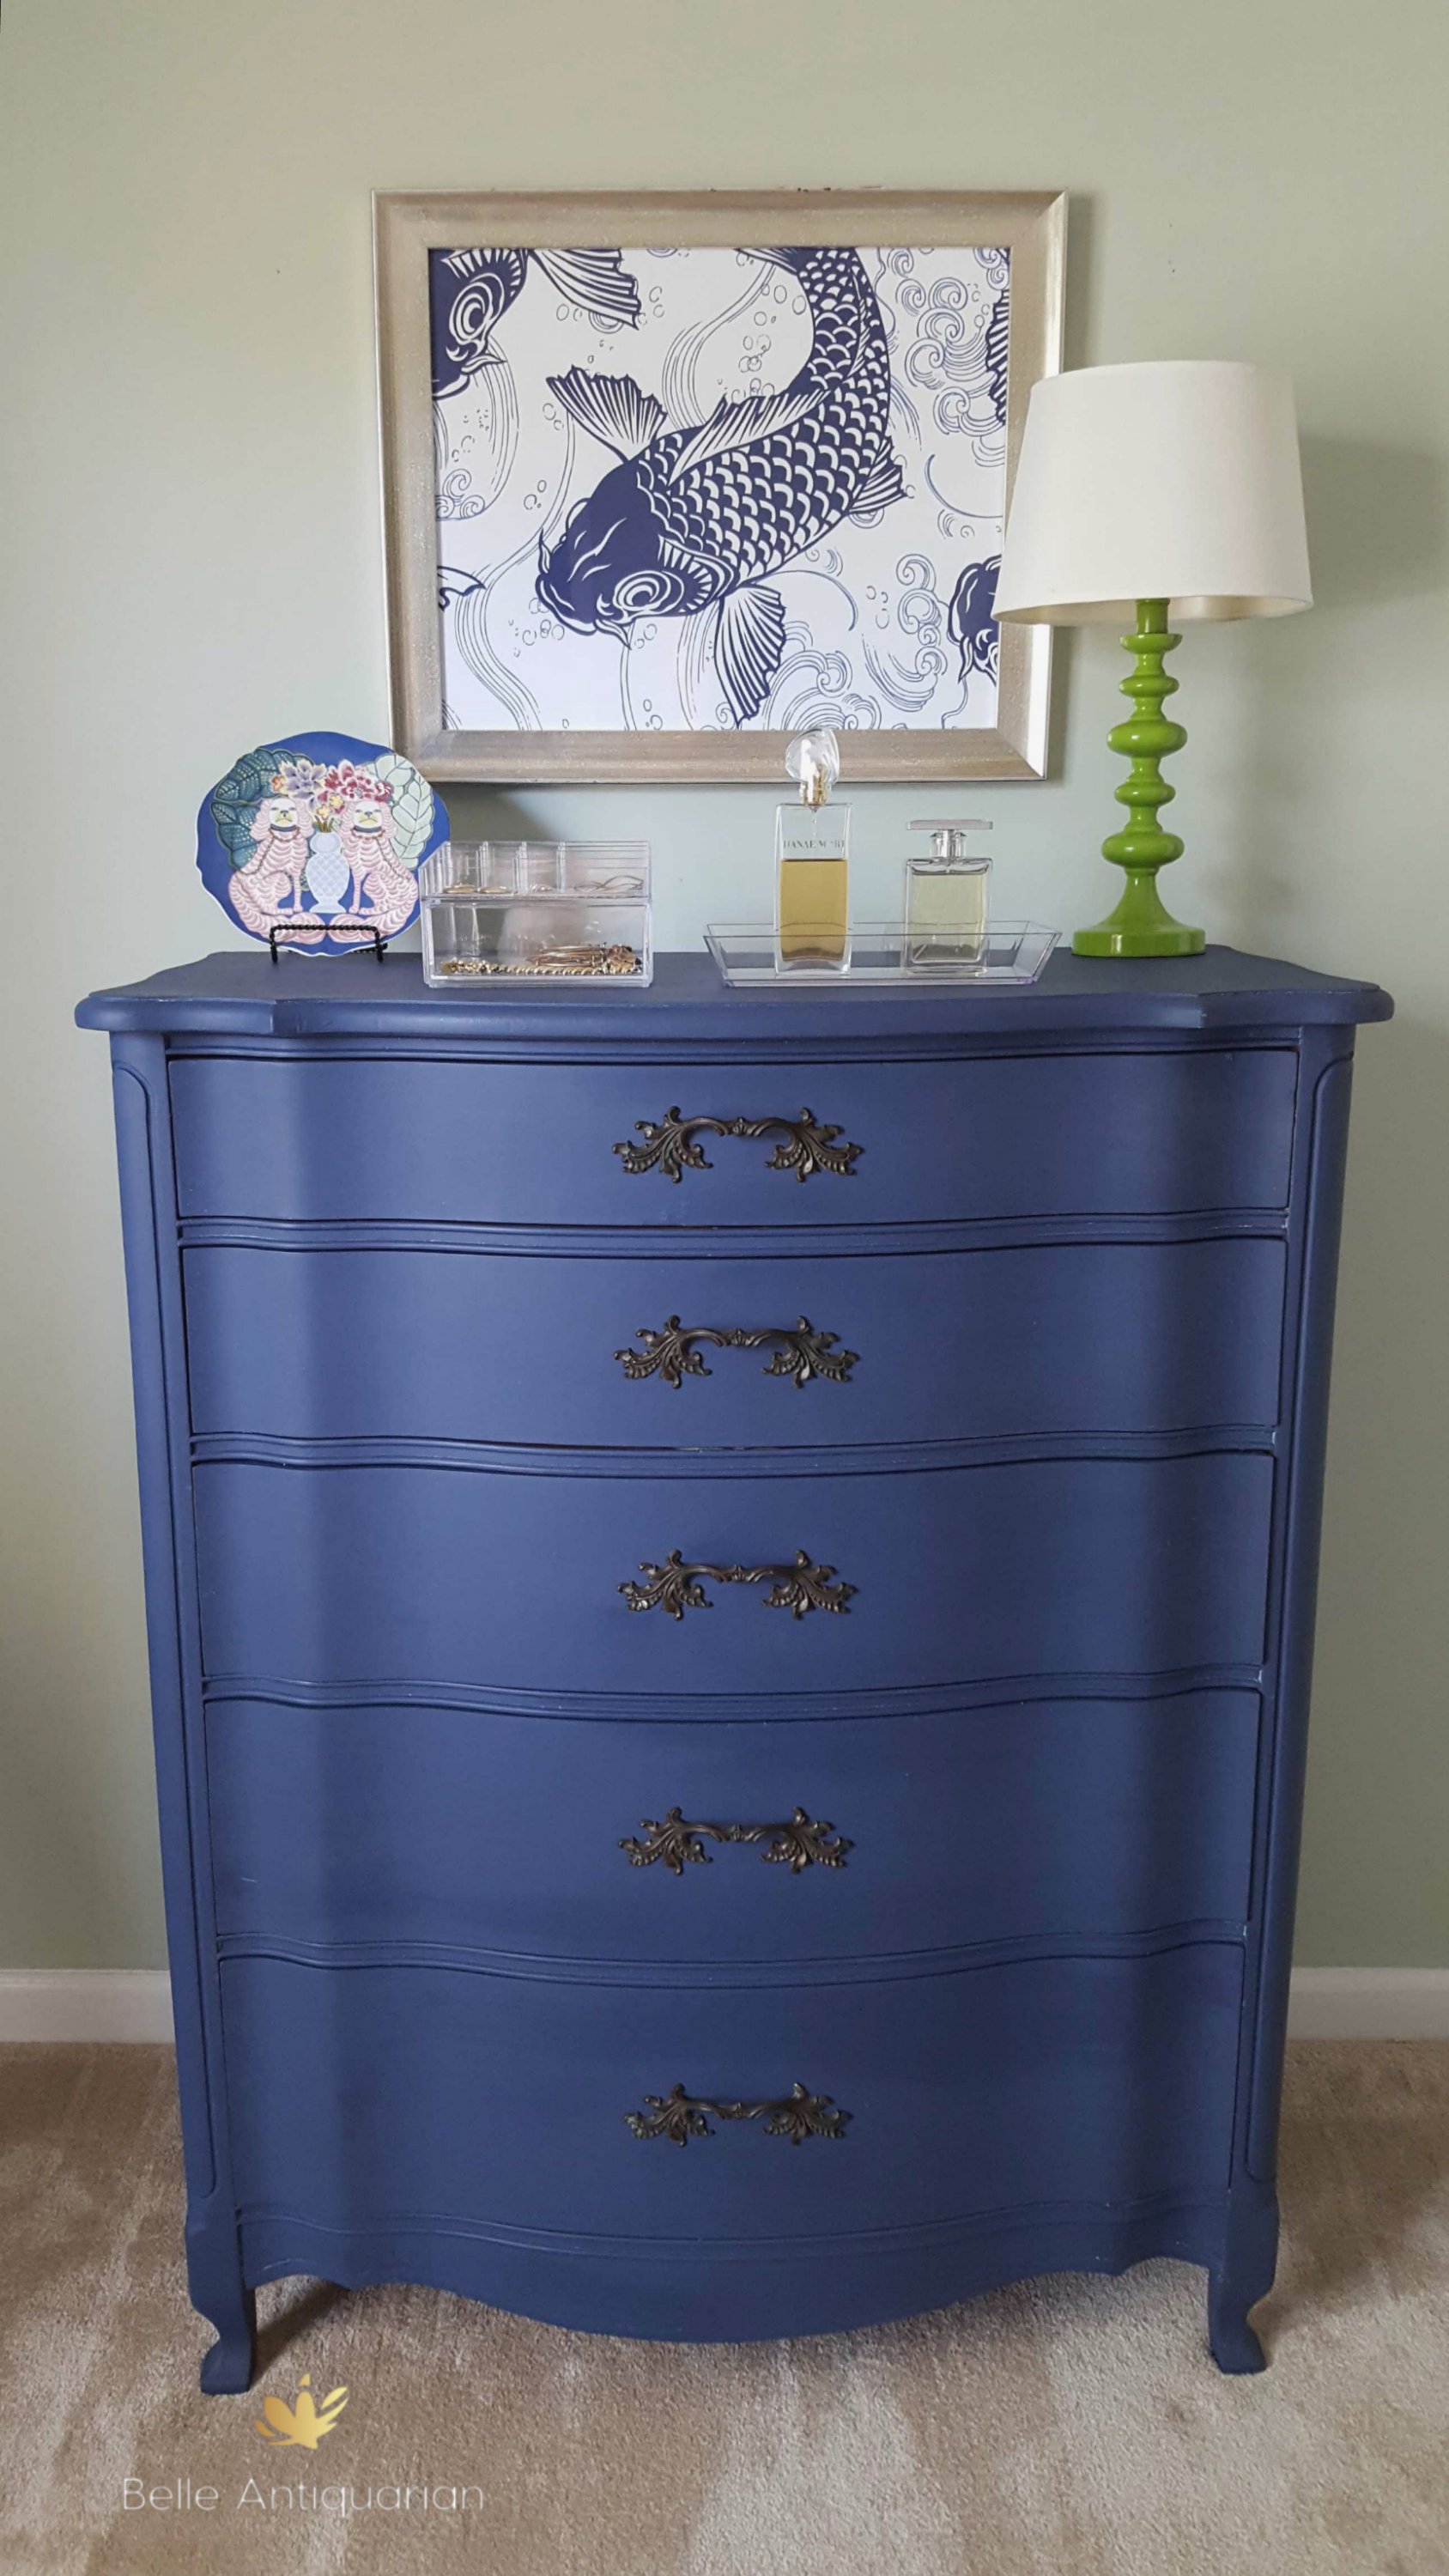
I selected a dark navy paint for the body of the dresser, and it turned out lighter than I wanted. I thought it might darken up after I waxed it, but no, it didn’t. That’s okay, too, because this blue goes well with the tone of the green I painted inside the drawers. I already had the green paint, but I also considered a coral color.

I had just enough leftover koi paper to insert it into a frame that I already had in this spot. New art, I love it! The green lamp was from Samantha’s room before we gave it a makeover. It will be a fun pop of color when this goes in our closet.

This dresser was the very last piece of furniture I purchased specifically to paint. There are no more pieces to paint in the garage, and I don’t intend on getting any. On my to-do list are things like getting an organizational system for the closet and painting our bedroom. (It’s 14 ft x 27 ft, so I am dreading that.) Social media shows fast, all in one sitting makeovers, but I really think most people do things little by little.

Have a great weekend! We’re headed to the rodeo later today. Yee haw!

The 50 Week China Cabinet Makeover

There really isn’t a solid reason why, but this china cabinet took me 50 weeks to finish. I wasn’t feeling a big creative push when I started working on it, and I think at the time we were transitioning out of an antique store we were in. I.e. I didn’t have a big need for additional inventory. Regardless of why, it actually took 50 weeks from start to finish.

Here it is “before”…

//assets.pinterest.com/js/pinit.js

As always, a little repair work was needed before painting.


//assets.pinterest.com/js/pinit.jsSo there are a few things that lead me to believe this is from the 1920s – 30s. I think it has some definite Art Deco elements like the original handles on the bottom, the feet, and the trim work. (And who said I don’t use my degree on a daily basis?! Those Furniture History classes come in handy more than I ever thought they would.)

So after 50 weeks, here is the after.

//assets.pinterest.com/js/pinit.js
Obviously there was a color change. I made my own “chalky” paint from scratch using Benjamin Moore’s Danville Tan. Painting was necessary mainly because of the repair work needed. I also changed the glass on the front. I created a “mercury glass” type of finish instead of clear glass. There are lots of methods for creating mercury glass if you search for it on Pinterest. It’s not my first time doing this technique, but a word to the wise: Just like a crackle finish will never turn out the same way twice, mercury glass will never turn out the same way twice. Let’s just say I thought long and hard, was definitely sure it was what I wanted to do, took some long, calming breaths, and said a prayer before I started it.

I’m happy the “mercury glass” turned out well!

It would have been fine without the mercury glass finish, but it didn’t seem quite complete to me without it.

The handles on the bottom are unique. I’m all about using the original hardware whenever possible.

Here’s the before and after…

//assets.pinterest.com/js/pinit.js

What a big difference! I know it’s hard to tell from the pictures how big this is. It’s only about 64″ tall, which is on the smaller side for a china cabinet. That’s typical for the time period it’s from though. I can totally see this being used as anything from bathroom storage to a bar or bookshelf.

//assets.pinterest.com/js/pinit.jsUntil next time…

Soft Aqua Dresser

Another new dresser! I don’t know why I’m so bad about showing these off to everyone once they’re finished. I’m really going to try to be better about that.

Here’s a small dresser that I picked up a while ago. As always, it needed some repair work. I don’t tend to paint quality wood furniture unless there’s something wrong with it. I do make exceptions for “ugly” furniture that needs a makeover though.

I usually try to paint furniture in neutral colors so that more people will be able to use them. But I have this one particular blue color that I love to use. It’s a custom color that I make. I make my own “chalky” paint. There are recipes galore on Pinterest.

I’ve had a hard time capturing the true color in photos. I like to describe it as the perfect, soft aqua/blue/teal color.

I’m happy that I was able to keep the original hardware. It still looks great, and it’s usually higher quality craftsmanship that what is currently available.

This is fairly small, just 35″ tall. Perfect for a guest bedroom or even bathroom storage.

I also just finished an Art Deco era china cabinet that I’ll post about soon. I seriously started working on it 50 weeks ago – almost a year! I’m glad it is done.

Dresser Makeover, Hardware Too!

Sometimes I forget exactly how many pieces of furniture have come and gone through our hands. It doesn’t seem like that many until I start scrolling through the files on our computer. It’s a lot, y’all. There’s a lot of learning and hands-on experience that have resulted from doing so many pieces, but from time to time I still come across problems that need to be solved.

Here’s a dresser that I just finished. Sorry, I don’t have a great before picture, but it’s the one on the right. It was blah, painted brown, and nothing to be desired. It’s wood, but the wood was painted over with a brown color. Not sure why.
I decided to go with gray and blue. I’m holding off on the “after” picture because I want to talk about my hardware problem first. I may have mentioned it before but ALWAYS, for the love of Pete, ALWAYS count the hardware before you buy it. Why? I promise you that you WILL spend more on new hardware than you did on the piece. And I also promise you that you won’t be able to find new hardware that matches up to old holes. Trust me.  So anyway, I counted the hardware, but failed to notice that some of it was damaged. Take a look:
Pretty brass hardware (y’all know it’s back, right?) with some faux tortoise cabochon type thingies. Except, some of the cabochons were broken and some were missing completely. First of all, let me be completely honest: The cabochons were ugly and plastic-y feeling. But I would have TOTALLY left them on there if they had all been intact. Not gonna lie – I would not have spent a dime to replace them. 
However, that wasn’t an option. I played around with several things, but I ended up coming up with this:
I married the old, original drawer pull with a new, pretty knob. And….I love it. But wait, there’s more. The next problem? Screws. Yep, turns out it was annoyingly difficult to find screws that worked. I got some blank stares at a local hardware store, and one morning I had two employees at Home Depot finally help me put together something that worked. I needed 8 screws exactly, but…
Instead I got 7 plus this screw ^ that someone didn’t turn into a screw. (Another trip back to Home Depot.)
Ok, finally. Here’s the after:

//assets.pinterest.com/js/pinit.js

//assets.pinterest.com/js/pinit.js

The hardware certainly wasn’t an issue I anticipated, but I think it completely transformed the piece. What do you think?

//assets.pinterest.com/js/pinit.js

Crafts to Make with Hymnal Pages

//assets.pinterest.com/js/pinit.js

Yesterday I listed several vintage and antique hymnals in my Etsy shop, and I had a friend ask, “but what would someone do with an old hymnal…?”

Besides simply enjoying looking through it and being reminded of many of the traditional hymns that are no longer sung at church services, there are many wonderful ways you can repurpose them. In a way, repurposing will actually extend their “life.” Something like an old hymnal that may be worn thin and have no value to most people can be turned into things that will be used and treasured for years to come. Below are just a few of the neat crafts I found on Pinterest that use hymnal pages.

One of my favorites, Miss Mustard Seed used old hymnal pages on a lovely dresser:

Music Sheet Dresser....I would like to do this with some of the old hymnals I have
On AJ’s Trash to Treasure Blog, you can see that just about anything can get covered in hymnal pages, including lamp shades: 
10,7,10 CA projects110  SPECIAL HINT FOR LAMP SHADES:  Paper the INSIDE as well as the outside.  When the light shines through, all you seams and overlaps are OVERLY obvious.  By double layering your paper (one layer outside and one layer inside) it will minimize this.
The Picadilly Post turns hymnal pages in works of art:
I love this -- I think I would use the hymn 'The Old Rugged Cross' or 'In The Garden' or 'It Is Well With My Soul'...
Christmas ornaments seem like something doable even for the beginning crafter. These were found on Houzz
IDEA:  Hang on dining room window latches    in love with these diy cloth ornaments and color scheme for sun-room - all year
Use them to make a wreath. Here’s a How-To from HomeTalk:
A Hymnal Page Wreath :: Hometalk
Here’s an old blog post of mine where I used hymnal pages in a painting:
In my opinion the easiest and cheapest way to use hymnal pages is to simply frame them! In my home I have this framed song in our guest bedroom: 
Now let your imagination flow! 
Tips: You can link back to all sources. Hover in each introductory sentence to find the link.  If you are interested in purchasing one of the hymnals in my shop to use for a project or just to keep, go HERE. (Listed under “Books” on the left.) Depending on the day there’s usually 2 to 20 available. I’m happy to check a hymnal if you’re looking for a particular song, year, or church affiliation. 

//assets.pinterest.com/js/pinit.js

Duck Egg Blue Dresser

Hi Friends!

I recently rehabed a Bassett 4 drawer dresser. This came from an estate sale about a year ago.  Since we sold several pieces in a short amount of time, I had to get it done. No more procrastinating on this one!

Before

The top needed some TLC, so painting was the only way to go. This sucker is solid wood. Medium sized, but oh so heavy!

Add that TLC we talked about, along with some Duck Egg Blue (which is sort of green) chalky paint, some special artistic detailing, and we have a much prettier little thing. Don’t you agree?

//assets.pinterest.com/js/pinit.js

After

//assets.pinterest.com/js/pinit.js

Awww! I loooovvvvve this one! Hope you do, too.

Furniture Disaster. Personal Disaster?

//assets.pinterest.com/js/pinit.js
We recently found some furniture that we decided to refinish (stain) and keep, rather than sell. I prefer to paint furniture. I have done my share of sanding, but to me painting is second nature. I know exactly how the paint will behave and turn out. The paint and I have an agreement that way. We understand each other. 😉 Okay, the paint doesn’t understand me at all, but I understand the paint.

Anyway, there’s a dresser and a desk. They are made of solid, heavy wood. Quality furniture made by Stanley. I.e. Boy proof. Perfect for our boy, soon to be a teenager. Only they weren’t in perfect condition.

Here’s a piece of knowledge that I want to share with you. Because when I was a green antiquarian and finder of vintage things, I wish someone had shared it with me. Look at the knobs. Count the knobs. Are they all there? Why…do you ask? Because hardware.is.expensive. Let’s just say that we spent more on the hardware than on the furniture.

//assets.pinterest.com/js/pinit.js

This picture does not express how frigid it was this day.

So Ken spent hours. HOURS. sanding the furniture. And then he spent hours. HOURS. asking me if I ordered the knobs. And the furniture sat for hours. WEEKS. in the garage because I didn’t want to stain it in the cold, and why bother to order knobs if I’m not ready to stain it? That’s how we operate. If you look closely you will see the logic.

So halfway through Jackson’s (our son) room remodel, I decide that it is time (finally) to restain the dresser and desk. And I stain it. And it’s horrible. And I’m sad about that. Because I’ll have to resand it and start again.

I’m kind of like that furniture. God has worked on me and worked on me. HOURS. WEEKS. My LIFETIME. And I’m so far from perfect. I’ve had moments in my life where I’ve been horrible. I’ve made serious mistakes. But God will keep working on me and start again. No matter how many times my mistakes and imperfections stain me, He will forgive me and let me start again.

Why would I bother to blog about a project that isn’t done, and so far isn’t going well? Because I want you to know that I am not perfect, and I have been forgiven. You do not have to be perfect to receive God’s forgiveness and grace. If you are a Christ follower and you are working earnestly at an image of perfection, either on social media or in real life, ask yourself this, “Can I serve God better by sharing what He has saved me from or giving a false sense of perfection to the world?”

“Therefore, there is no condemnation for those who are in Christ Jesus, because through Christ Jesus the law of the Spirit of life set me free from the law of sin and death.” Romans 8:1,2

//assets.pinterest.com/js/pinit.jsXOXO,

Abby

The {Final} Nitty-Gritty on Sanding. When You’re Done?


I’ve noticed that a lot of times tutorials that go over how to use “furniture” (aka “chalk”) paint don’t go over what to do once the paint has dried. I personally have several more steps to go once the paint is dry on my furniture. I sand it, seal it, and often glaze it.

Sand it when the paint is dry? For latex or spray paint, not usually. For “furniture,” chalk, or milk paint, yes. There is an incredible difference in the finish of “furniture” paint when you sand it after it dries and when you don’t. It becomes incredibly smooth and “finished” looking. The paint should dry 8 hours, or overnight, before you sand it.

Depending on the look I am going for, I will either use 220 grit sandpaper or “00” steel wool. Usually using 220 grit sandpaper with my Black & Decker Mouse sander will give more of a distressed look. That means whatever the surface color was before you sanded it (wood or a different color) will show through on the edges and raised details. If I just want to “finish” the piece and I don’t want to distress it I will use “00” (double fine) steel wool. Even when using the “00” steel wool, be careful on the edges and details.

DON’T freak out when you sand your painted piece. Paint dust will come off. Trust me when I say, do not sand indoors, even a garage. You will cover everything in a fine coating of chalk dust. The great thing about “furniture” paint is, if you sand off too much, just touch it up with some more paint. Also, don’t freak out if your paint color “lightens” up a bit. This is just the effect of the “chalk” or plaster of Paris in the paint. When you apply your wax the color will deepen again.

Before you continue the process of finishing your painted piece after you have sanded it, wipe it down completely with a DRY cloth. Actually, most of the time I vacuum the piece with my shop vac when I’m done sanding. You can even use the final sanding process as a way to be creative with your paint. Once you have done a final sanding, you are ready to finish your piece with wax, polyurethane, or glaze. (or all of the above) 😉

I will go over more info on using “furniture” paint in a future blog post.
XOXO,
Abby

//assets.pinterest.com/js/pinit.js

The Nitty-Gritty on Sanding {Part Two}

In my previous post I went over the reasons why I would or wouldn’t sand a piece before refinishing it. In this post I’m going to go over how exactly to go about sanding.

Three things that will make your life easier while sanding:
#1 An electric hand held sander.
#2 Know your grit, Sherlock.

#3 Always sand in the direction of the grain. (the direction that the lines in the wood are going)

An electric hand held sander is going to cut your time by at least 75%. I have an old Black & Decker “Mouse” sander and I love it. I want a new sander, but just because I love tools. This one works great. Sandpaper is made especially to fit it and is easily put on and off. I like this because I can switch in between sandpapers when I’m working on something. Yes, it is possible to sand using a sanding block, but it is going to take you a lot of time.
 
Know your grit. Grit refers to the roughness of the sandpaper. The lower the number, the rougher the grit. You always, ALWAYS start with a lower number and work your way up to the higher number. For example, when I am refinishing a table top I will start with 60 grit. The 60 grit will grind down through any varnish and stain to the bare wood. If you use 60 grit too long, it will eventually start to grind away at your wood. 60 grit will leave your surface rough. There will be visible sanding marks and your piece will not be ready to paint or stain.

After removing the paint, varnish, or stain you were aiming to remove, next you will be ready to start creating a smooth surface ready for your finish. I like to move from 60 grit to 120 to 220. Going in this order will leave you with a quality surface that looks professional and neat. Be sure to check the surfaces that you’re sanding from different angles. If you are able to see sanding marks, you will need to re-sand that area to get rid of them, which is why I like the mouse. If I am working with the 220 grit sandpaper and I see marks left from the 60 grit, I can take the 220 off and put some 120 back on, remove the 60 grit marks, and then move back to the 220.

Finally, always sand with the grain of the wood. “Grain of the wood” refers to the direction that the lines in the wood are going. Don’t argue; just do it.

If you’ve sanded properly, when you apply your stain you will be rewarded with a thing of beauty. If you apply your stain and you suddenly see marks from sanding, wait for the stain to dry and begin again.

Sanding is one of those things that when you do it right, it is completely rewarding. You can literally see your hard work pay off. I’ll go over how to stain furniture sometime in the future.
This is my 12 year old sanding a bookshelf for his room. Don’t be afraid to get started. You can do this.
 
Next up will be: Sanding when you’re…done?

XOXO,
Abby


//assets.pinterest.com/js/pinit.js

The Nitty-Gritty on Sanding {Part One}

I’ve had some questions about sanding furniture, so I thought I would do a series of posts about it. Sanding isn’t my favorite thing to do. However, it can be very rewarding when it is done correctly. Since this is such a big topic, in this post I will cover information about sanding prior to painting or refinishing.

Before you start on a piece it is important to decide whether or not you need to sand at all. Let tell you when I don’t sand.
  • When I start with a piece that is unpainted, painted, or stained and I am planning to completely cover it in “furniture” (chalk) paint.
  • When I start with a piece that is painted or stained and I am planning to use a crackle finish, and I want the existing paint or stain to show through when it crackles.
  • Even if I am making repairs to the piece with wood putty or rebuilding a foot, for example, I only sand to make the repair even with the rest of the piece. I don’t sand the entire piece.

I make my own “furniture” paint. Some people may call it “chalk paint.” My furniture paint does not require prepping the surface before you use it. It will stick, and stick well, without sanding. That’s the whole point of using this kind of paint — to save time and prep.  So if you’re painting the whole piece and you’re using “furniture” paint, don’t waste your time by spending hours sanding.

Now here is when I DO sand prior to painting and refinishing:
  • I’m painting the piece, except for maybe the top of a dresser or a table top. In that case I will only sand the surface that isn’tgetting painted.
  • I’m using spray paint. Spray paint will show even tiny imperfections.
  • The piece is already painted, and I am planning to do a crackle finish that doesn’t include the current color.
  • The piece is painted and I want to remove the paint and stain it instead.
  • The piece is stained and needs to be re-stained.

I get a lot of questions about furniture and most people assume that everything needs to be sanded. This is not the case. Remember, chances are if you are painting the entire piece you do not need to sand before you paint with “furniture” (chalk) paint.

 
Come back in a few days for my post on how to sand.
Hope this helps!
XOXO,
Abby

//assets.pinterest.com/js/pinit.js