Patriotic Summer Decor

Patriotic Summer Decor

Red, white, and blue can carry you Memorial Day through Labor Day.

One of the reasons I love decorating for the summer is I know that once I have my home all decorated I can leave it up for a long time. If you break out all of your red, white, and blue patriotic decor in May for Memorial Day, you can have your home decorated for flag day in June, Fourth of July, and all the way until Labor Day in September.
I have one storage bin with some Fourth of July and patriotic decorations. I will also “shop” my home for some other red, white, or blue items. I also like to include seashells, because they remind me of summer. I like to think of seashells as a neutral color. I even use them to check off the “white” if I am missing that in a red, white, and blue vignette.
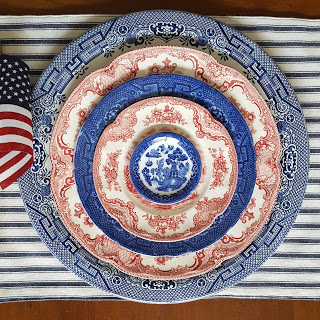
Layer china patterns for a patriotic look. How cute are these Allerton’s Blue Willow individual butter pat dishes?
I like to use red Coca-Cola crates, vintage Pyrex bowls, books, and napkins for “red”. Blue canning jars, picture frames, and Blue Willow china are perfect for “blue”. White seashells, milk glass dishes, and anything silver will make your “white”.
Use seashells you picked up on the beach for filler.

Another tip I have is one that I use for every holiday. Shop the after-holiday clearance sale. I’ve had this bunting and these “fans” for a couple of years in my storage bin. I found them on clearance at Target a few years back.
Everyday items grouped together in red, white, and blue combinations suddenly turn into patriotic decor. I used a Blue Willow teapot, a red transferware platter, and some red & white flowers to make this grouping.
20190706_114351
Summer makes me so happy! I hope you find joy in this season as well.

Spring Entryway Decorations

The sunshine and warmer temps have definitely been inspiring. Our bright and happy Easter and Spring decorations have carried throughout the house. Here are a few pictures of the entryway.

Click any photo if you want to see it bigger!

//assets.pinterest.com/js/pinit.js

I don’t think I’ve shared a photo of this table yet. It was originally a dark cherry finish. The bottom has a glaze over powder blue and the top has been “crackled.” 

//assets.pinterest.com/js/pinit.js

This little lamb is so sweet, don’t you think? Plus, tulips in antique Ball jars is a no brainer. The chalkboard was picked up at Hobby Lobby and I used our barnwood vinegar stain from THIS POST to age the frame. Before, it was new and unstained. 

//assets.pinterest.com/js/pinit.js

This typewriter is a fave. I picked it up one year while on an adventure with my sister, Tara, at the Crabapple Antique Festival in Milton, Georgia. If you’re interested in finding other antique festivals in Georgia go HERE and HERE. (It’s an older post so the dates won’t be accurate, but you can put it in the Google-machine.) 

How to Create an Easter Centerpiece in 3 Easy Steps

//assets.pinterest.com/js/pinit.js

Good Morning! I’m working on some Easter decorations and thought I’d share my 3 step method for those of you that might get stuck and need some inspiration. Breaking it down into 3 simple steps makes things so much easier!

Things you already own can be used as a container!

Step #1 Pick a Container

I “shopped” around my house for options to use as a container for a centerpiece. These things all seemed to have Easter-like colors or inspired me with an idea. The clear glass kitchen canisters can be purchased at Walmart. They are made by Anchor Hocking and you can find them in the kitchen storage section. The antique Ball jar, jadeite bowl, Brush McCoy bowl, and milk glass sugar bowl were all items that I’ve picked up over the years.

For help finding these, check the floral department of a craft store.

Step #2 Pick a Filler

Most Easter decorations are inspired by nature: rabbits, chicks, eggs, carrots. I tried to keep in this mindset while I picked up some dried moss, raffia, Easter grass made of straw, and natural looking eggs. I found all of these at Michaels. The Easter stuff was all 40% off, plus I had a 20% off everything coupon. Sweet!

My cast of Easter characters that I used for focal points.

Step #3 Choose Your Focal Point

Find something to be at the center of your centerpiece. 😉 I’ve had the ducks for years; I think they actually came from Party City. The lamb has been around a while, too. Hobby Lobby, maybe? The rabbits are all new from World Market. (Oh, I love you World Market.)

Put the filler into the container and arrange the focal point. That’s it!

//assets.pinterest.com/js/pinit.js

1. Jadeite bowl 2. Straw grass and eggs 3. Bunny
1. Cake plate for a container 2. Moss and straw grass 3. Egg holder (World Market)

Same as above, except the focal point is the lamb.

1. Extra large glass canister 2. Dried moss and eggs 3. Rabbit (I did add some ribbon to this one.)
Same as above except I put in an antique book and the smaller bunnies.
1. Antique Ball jar 2. Straw grass 3. The eggs are the focal point in this one!
//assets.pinterest.com/js/pinit.jsI truly hope this helps you create some lovely decorations for your home. I’d love to see your creations or to know what was helpful for you.

//assets.pinterest.com/js/pinit.js

Before & After: Painted Wood Hutch

I’m so thankful for Spring. It really makes a big difference in my motivation. When it starts to really get cold again this fall, I’m going to give myself permission to forget about painting furniture until spring comes again. No expectations for myself to work in the cold, blah weather means no guilt for not accomplishing anything.

I’ve had this hutch in my garage. (We keep our cars in the driveway and our furniture in the garage. Don’t y’all?) I hadn’t planned on what I was going to do with it, but I got a burst of energy and motivation this week to just get it done.

Seriously. Ugly, right?

//assets.pinterest.com/js/pinit.jsI think what I disliked about this the most is that there was no visual interest in the wood. I’m not against wood furniture, but this one was just like a big blog of orange-y stained wood. And the doors. Tragic. This isn’t a giant piece. I’ve been lifting and lugging it around all by my petite flower of a self. (I really hope you read that with sarcasm.) But it is a piece of furniture that will be extremely useful to someone. Not me, though. No room in the inn.

Much better. Much, much better.

//assets.pinterest.com/js/pinit.jsNow there is some visual interest. I left the surfaces unpainted that would get the most use. You can see a similarly dramatic difference in a before and after picture of me in makeup. #redhead

//assets.pinterest.com/js/pinit.jsI’ve put some of my jadeite and jars on it so you can visualize what it would look like in use.

Hope you love it!
XOXO,
Abby

Mason Jar Lamp: Fall Re-Mix

I love making something that can be used in many different ways. Remember this guy?

 
Well, I pretty much got tired of the lamp shade. And I got sick of the corks. Truth be told, I probably won’t drink enough wine in my entire life to even get it half-full. (The craziest it usually gets around here is chocolate milk, folks.)
 
I love the lamp itself too much to sell it (collaborative groan from the masses), but I wanted to change it up. So it now sits on my mantle with a new brown shade ($5, Walmart) and some colorful autumn glass thingies. This was a super quick change! Remember, the top screws off.


By the way, I want to thank everyone for visiting and for your support. I now have well over 25,000 views in less than and year, and that makes me feel reeeeeealllll special. 😉
 
 
XOXO,
Abby

//assets.pinterest.com/js/pinit.js

Antiquing Vacation (Mom’s "vacation")

What’s the difference between a trip and a vacation?

A trip is with the kids, a vacation is without. 😉

There’s a down-side to vacationing on a non-commercialized beach. Ask any mom stuck in her beach rental on rainy day, and you will have your answer simply by looking at the blank stare she gives you. So close, and yet so far away. See kids? Look at the beach! Look, but don’t touch!

Historic Fernandina Beach on Amelia Island, Florida  

  We just got back from our family vacation to the lovely and oh so quiet Amelia Island, where there is only so much one can do on a rainy day full of thunderstorms. (Gee, thanks, Tropical Storm Andrea!) The nearby theater has 3 movies. Hangover 3 is not an option for 8 and 11 year olds, thank you very much. And a family of four can only stroll around Target for so long before it gets a little awkward with the employees. Nope, I really don’t need help finding anything. Just staring at the “ground beef” you’re selling because the thought of going back to the condo and being hen-pecked to death made me break out into a sweat. (Target sells “meat”?!?!)

A little piece of paradise on Amelia Island, Florida

The thought crossed my mind to dole out heavy doses of Benadryl and load everyone back up into the car in the middle of the night. Surprise! We’re home! Mommy’s not on “vacation” (i.e work outside of the home) anymore.

Sensing the desperation in my eyes, my handsome and hunky husband suggested that we do a little “work.” Yeah for me, treasure hunting! Boo for the kids, they know this routine. ;P After a little “researching,” off we went.

The kids really are pros and troopers. We made about a dozen stops. I love the thrill of the hunt, but there is a reason why it’s called “work.” Because it is.

Don’t judge. It was storming. I was tired. And the hat was definitely necessary.
My favorite find of the day is this jadeite Santa cookie jar. Isn’t he lovely?! Much to Ken’s surprise, I’m going to part with him. I do love my jadeite, but I know there’s a jadeite lover out there that will appreciate him just as much.

//assets.pinterest.com/js/pinit.js

The moral of the story? Even a rainy day at the beach is better than a day away from the beach!
XOXO,
Abby

This is currently for sale in my Etsy shop. Click “Etsy” for a link.

Drop Leaf {Table} Like It’s Hot


I love marking things off of my “list.” And this table has been on my to-do list for wayyyyyy too long. I have procrastinated doing this table like nobody’s (I’ll get to it) tomorrow.

I paid more than I thought I should have. (We left it in the garage.)

I thought it was going to be very difficult and time consuming to fix. (We dumped stuff on top of it.)

I thought the existing finish was going to be stubborn. (We never even completely unwrapped it.)

But you’ll never guess what happened. It’s the first piece that I have been able to refinish 100% on my own. As in, no one had to move it for me. No one had to hold it up while I did anything to it. I did it all. On. my. own. Oh, how glorious it is to say that. I hate asking for help. For anything. (Do you know that about me yet?)

I sanded the top just to rough it up a little bit for some “tooth.” “Tooth” means something for the paint to grab onto. Chalk paint isn’t supposed to need priming or sanding, but like I mentioned, I was worried about the existing finish being stubborn and difficult. I didn’t sand anything other than the top.

I make my own chalk paint. I used Martha Stewart Living in “Duck’s Egg” as my base.
After that I used Valspar Glaze in “Mocha.” 
Lastly, I used Krylon UV-Resistant Matte spray finish. I didn’t use a wax as I normally do because I didn’t want any sheen (shine), however I did want some protection on the table top. The trick to using this spray and having it be truly matte, with no spray marks, is to hold it at least 12 inches away from your surface. If  you hold it much closer than that you won’t have an even finish. As the directions on the can say, wait at least 2 minutes in between coats to avoid “white-ish” spots.

It’s more green than in this pictures. Don’t know why this came out so much lighter.

This table is perfect for our house. We like to have big family meals with the whole family, which is 15 and counting. If we open this up with the two leaves and combine it with our other dining table which seats 8. there will be plenty of room for everyone.

I hope you love it as much as I do.

XOXO,
Abby

Mason Jar Lamp (You.Can.Do.It.)

Cliche intro:
Getting started is the hardest part.

In this case, it’s true. I’ve had these large Ball mason jars for months and months. I’ve had the lamp shade for almost as long. I’ve had the light kit for weeks. But for some reason I had a mental block on this project, which turned out to be one of the easiest I’ve ever done.


Today was, well strange. Have you ever had one of those kinds of days where you just felt, I don’t know, out of place the whole day? That was my day today. And I needed to feel good about something. That something was this lamp.

So I took my light kit (that I purchased from Lowe’s) up to my closest Home Depot (bad form?) and asked the nearest guy in an orange apron to tell me exactly what I needed. Here’s what you’ll need:

Lamp kit (Lowe’s Home Improvement), a large mason jar (antique store), a drill bit (Home Depot), hammer, screwdriver, lampshade (Cost Plus World Market).

This drill bit is for metal. I’ll go over why metal in just a sec. It’s the right size for the metal piece that connects the lamp socket to the top of the lid. And, for some reason, it’s size really intimidated me.

You may or may not know, but an authentic lid for an antique Ball jar is made of zinc and ceramic. In order to drill through the ceramic glass I would need a different bit. My thought was that if I was going to drill through it and ruin it, why not just break it? So I did. Break it. This is what you’ll need the hammer for. Just give it a light tap, break it, and dump out the glass in the trash. It will leave only the zinc (metal) lid. Which is why I only needed a bit that would drill through metal.

Warning: Chipped Manicure is likely to occur while handling power tools.


After removing the glass, I very easily drilled a hole through the lid. I attached the socket and I was almost done! If you’re wondering, the cord does not go down through the jar and out the bottom. The cord is attached to the socket at the top of the jar. More on this in a sec.

Next, time for the lamp shade. I purchased this burlap lamp shade from Cost Plus World Market. It is the “accent” size. I’ve bought this shade before (see the post on the milk glass lamp), and for some reason the opening for it to fit over the socket is too big. I have a strange and simple solution for that, and it’s called, “Nerf Gun Bullet.”

Remove the end. Cut a slit down one side. Fit  over the opening.

These Nerf gun bullets are easily found, but mostly in piles by the hundreds in my front yard thanks to my boy.

Remember that I mentioned that the cord did not go through the lamp, but is attached to the socket at the top. That comes in handy if you choose to fill your jar with anything, say, wine corks. You could even change it out seasonally. Wouldn’t it look lovely filled with seashells?

Here is the finished product:

I need more wine corks. Who wants to come over and help me with that?

It turns out that the answer to getting this done was asking the right question of my Home Depot guy. Thanks, Home Depot guy. We salute you.

XOXO,
Abby//assets.pinterest.com/js/pinit.js

If You’ve Got It, Flaunt It

I’m in the holiday decorating mood today, but Ken is at work and there is no way that I’m attempting to shop for decorations with the kids in tow. Yesterday I hit up Home Depot with them, and by the time we got home, Mama needed something a whole lot stronger than hot chocolate.

So after scrounging around the house for materials that I already had on hand, I decided to get a little creative.

First I got together some different kinds of ribbon. I already had all of these at the house. On the right is a jute ribbon that I purchased from Save-On-Crafts.com several months ago. The other 5 types were all purchased at Michaels. The burlap style ones (all but the plaid) were purchased within the past 6 weeks. They have wired edges.

Next, I rounded up some containers. I use metal-type buckets for all of the kids birthday parties. I just change out a piece of ribbon on the handle to go with whatever the color/theme is. They’re great for utensils, etc. I also got some of the cuttings from our Christmas tree.

Three of the containers came from Goodwill: the wire egg basket, the fruit orchard basket, and the galvanized pail. The metal pail in the middle of the back row is a 2.5 paint bucket from Home Depot. It’s been a while since I bought it, but I think it was around $2. The oval shaped pail came from Target. It was in the “Dollar Spot” for $2.50.

Finally, I scrounged around and found some things to fill the buckets with.

I decided to start with the galvanized bucket. I layered two of the ribbons around it.

Proof in the background of yesterday’s Home Depot experience. Next I added some Epsom salts and a green tea light candle to a Ball jar. The jar, candle, and some Christmas tree cuttings were all nestled into the bucket. (I ended up not using the candles in the picture. I thought they were a little too big.)

Okay, so next I decided to play with the Home Depot paint bucket. He got two different ribbons layered onto the outside. He also got the same jar and candle routine.

Finally, I decided to use the orchard basket by the front door. I didn’t want to use a candle this time, so I opted to just fill it with tree cuttings.

The moral of the story is, try to use what you already have on hand. If you’ve got it, flaunt it! That’s all for now! I have some other ideas that I’m working on. Stay tuned.

By the way, if you hadn’t heard, our Etsy shop is opened! We are gradually getting lots of vintage, antique, and handmade items listed. Check it out! 🙂

Merry Christmas!
XOXO,
//assets.pinterest.com/js/pinit.jsAbby

{More than a} Message in a Bottle

I love containers. If they’re old, I love them even more. Suitcases, boxes, crates, jars, bowls. If it’s pretty, that’s one thing. But if you can use it, well then, I’m in love.

I have these bottles that I have been collecting. Starbucks frappuccino bottles, the kind that you can get from the grocery store. To me, they are totally reminiscent of old fashioned milk bottles. Our daughter loves drinking milk out of them. (She has an antiquarian’s heart.)


Come to find out, we aren’t the only ones that love them. Lots of you do! It is crazy to see how many different ways these bottles can be repurposed. I love that. Grass roots recycling, at its best.

Regardless of how you are going to repurpose them, you’ll need to get them cleaned up first. The labels are simply a sticker. So, I usually peel the stickers off, run the bottles through the dishwasher, and then remove the gummy residue left over. I like to use  Goo Gone to get the goop off. I have found that it really works better than anything else out there.

                                        
Once you have your bottles cleaned up, the possibilities are endless. Below I have put together just a few of the ideas that I have found on Pinterest. Follow Me on Pinterest


1. A soap dispenser by Domesticated Nomad.
2. Bowling party milk bottles by Hostess {with the mostess}
3. Sweet tea bottles by A Nest for All Seasons
4. Milk Men by Bakerella
5. Halloween treat jars by A Step in the Journey
6. Candy Apple Teacher Gifts by Giggles Galore
7. Milk Bottle and Bakers Twine by Whisker Graphics
8. Reindeer Food by Sweet Cheeks Tasty Treats
9. Homemade Gift with frappuccino bottles by Tip Junkie
10. Vases by Goodknits
11. Lux lamp by Alternative Consumer
If you have other ways that you have repurposed Starbucks frapp bottles, I’d love to see them. Please share!
Now, if I can just figure out what I want to do next with them…
XOXO,
Abby