Why the oldest tea cups don’t have handles

Today is Wednesday, but yesterday over on my Instagram it was Teaching Tuesday!

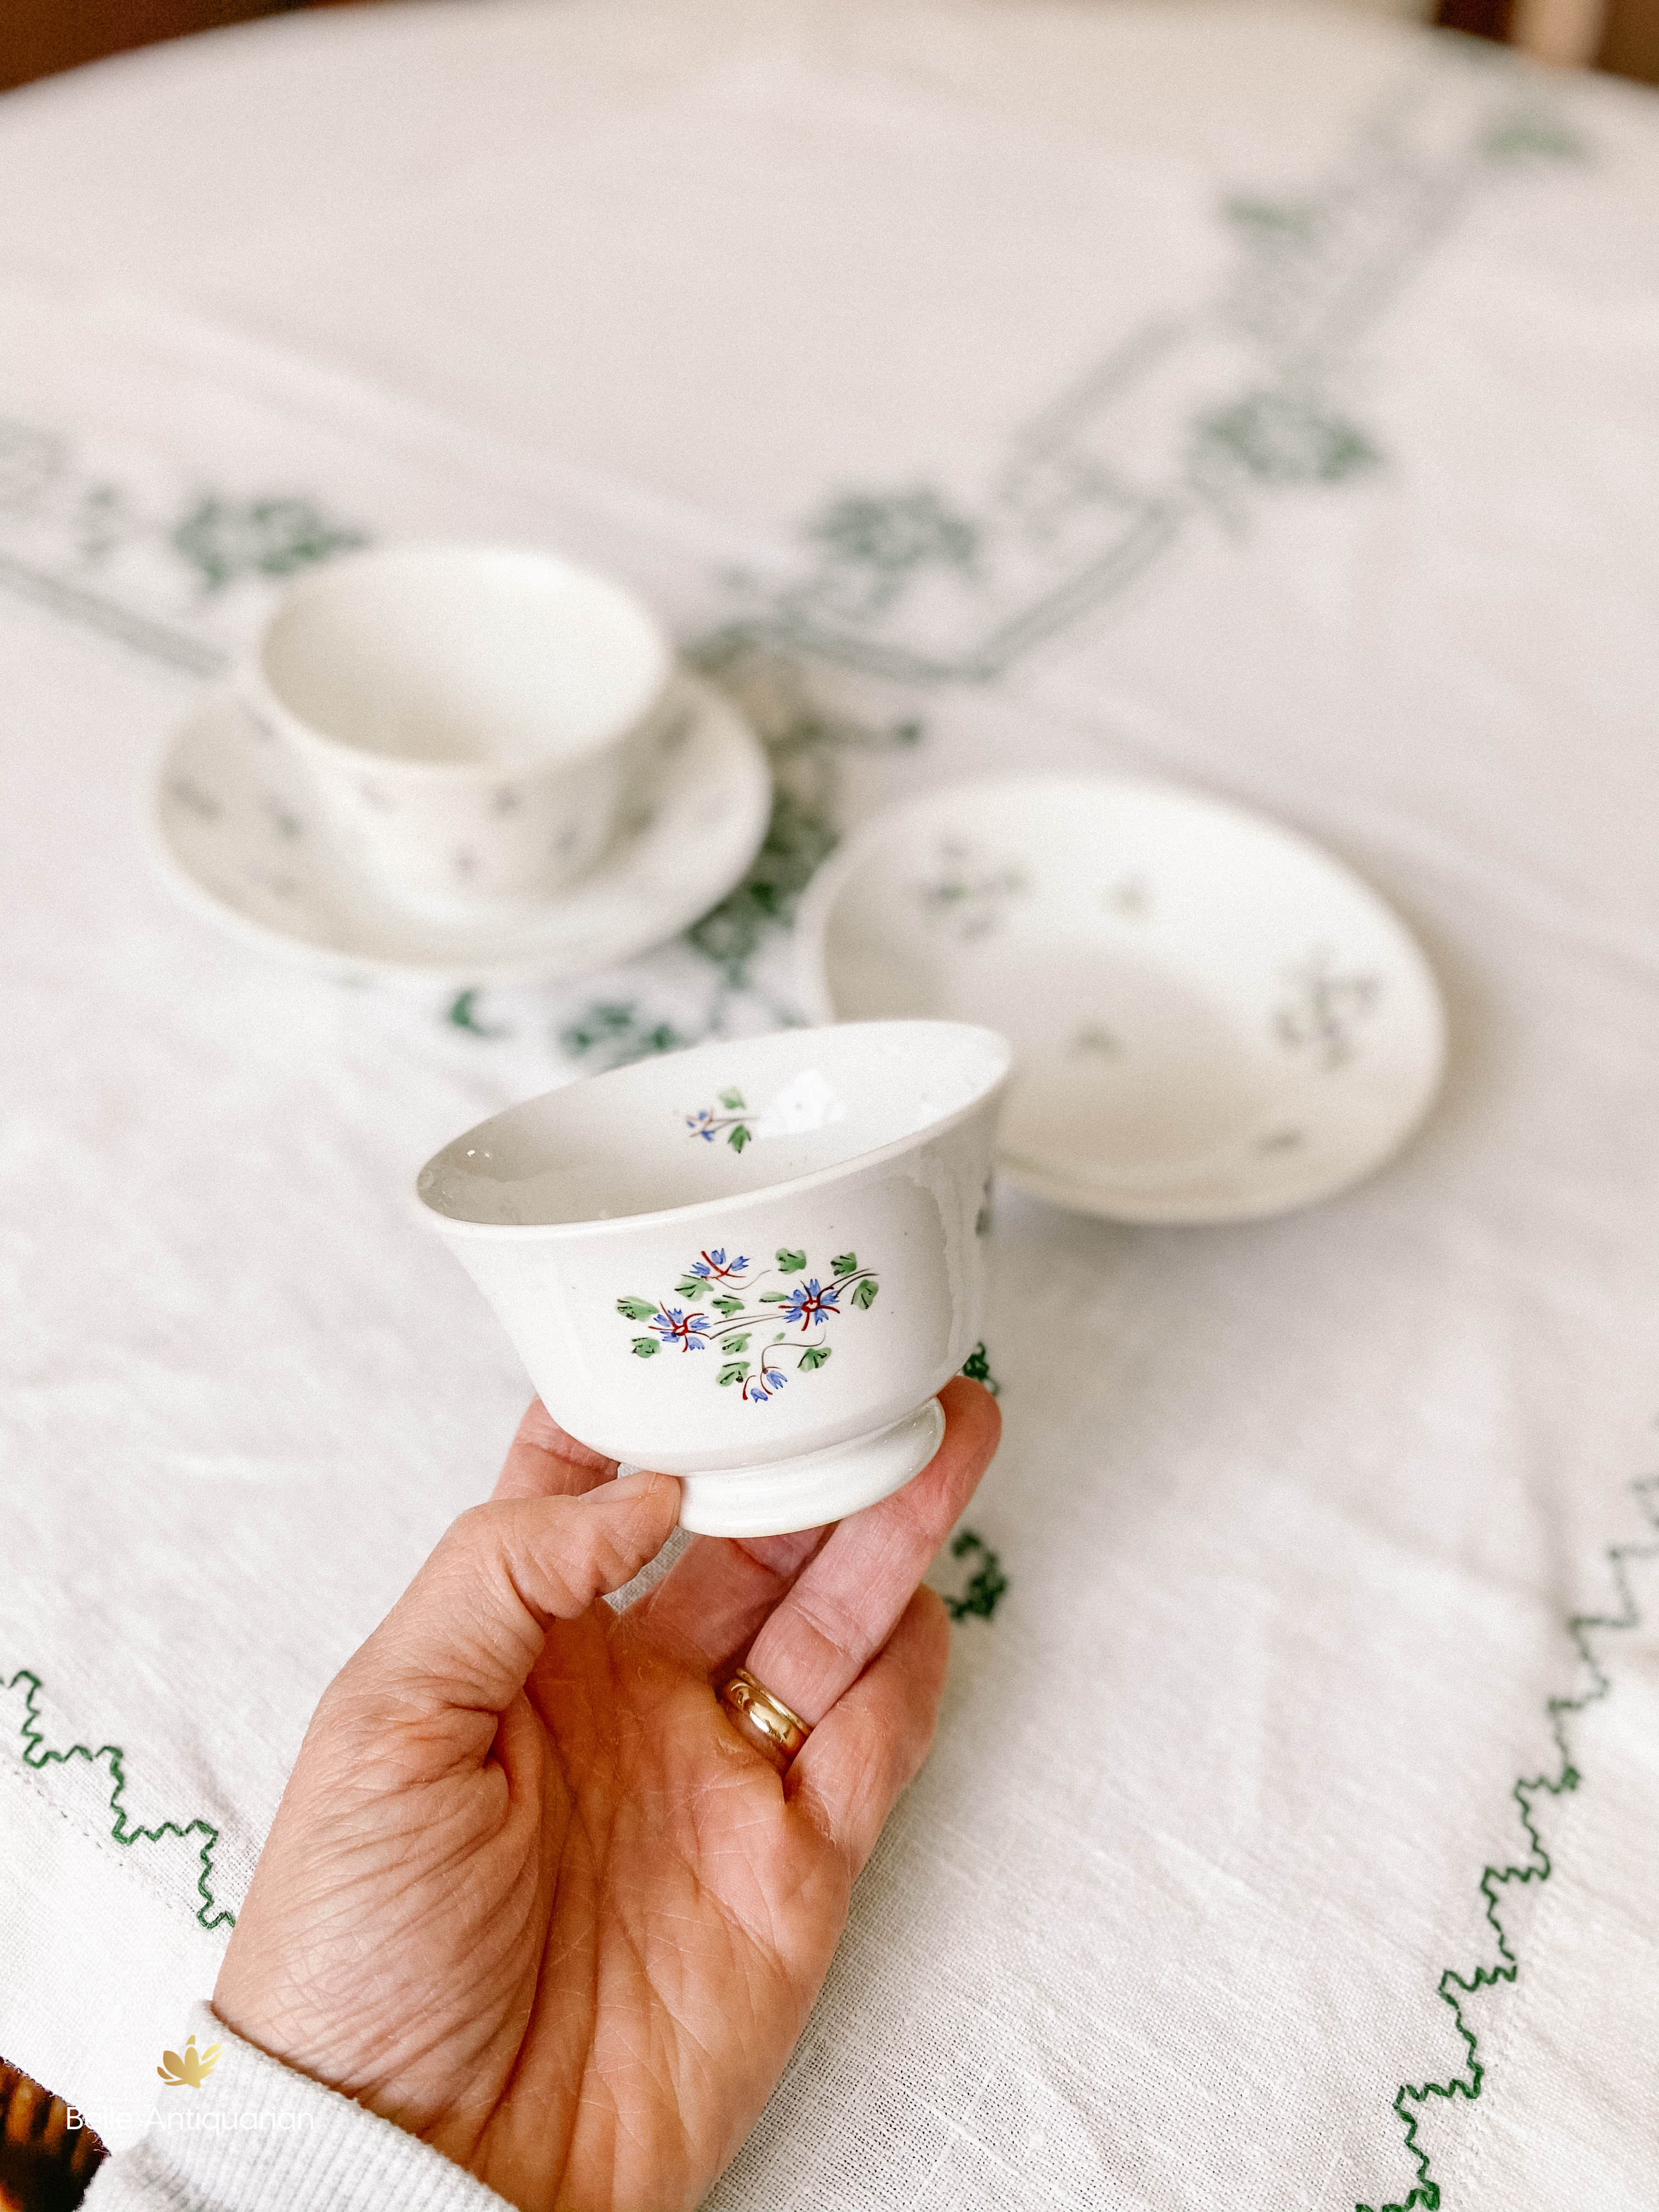
Did you know that the oldest tea cups don’t have handles? These have been in my family since the late 1700s/early 1800s. Here’s why they don’t have handles:


These are known as tea bowls or sipper cups. The English began drinking tea like the Chinese, but wanted theirs served piping hot. The tea bowls were too hot to hold, so they came up with a solution – saucers! They’d actually pour their tea into the saucers to cool it before drinking. Handles weren’t commonly added to tea cups until 1810. After which, using your saucer to cool your tea became vulgar. During the time of the Boston Tea Party and the American Revolution, this is how the colonists’ tea cups would’ve looked!

The proper way to hold a sipper tea cup is to place your first two fingers on the bottom of the cup and your thumb on the rim.

As you can see from the picture above, saucers were originally shaped more like a bowl. The rim is much higher than the saucers you see today. This was so it would hold the tea poured into it. Today we can use a saucer to hold a used tea spoon, tea bag, or to prevent drips from staining the table.

I hope you found this informative! You never know what will pop up over on my Instagram. Join me!

A History of Country Easter Egg Decorating: a Pennsylvania Dutch Tradition

//assets.pinterest.com/js/pinit.js

An introduction:

Today most families decorate their Easter eggs with store bought kits. I know we certainly do! The more advantageous egg decorators may even use natural dyes they discovered on Pinterest. I would like to share with you the history of how my grandparents and great-grandparents decorated Easter eggs with their kids, my dad included, while they lived in Shenandoah Valley, Virginia. Their ancestors were Pennsylvania Dutch and these methods for Easter egg dying most likely came with them from Pennsylvania to Virginia over a century ago. I post this here in the hope that this history will not be lost. Thank you to my aunts Gail and Martha who humored me a couple of years ago with my questions, and my apologies for taking so long to publish it here.

Easter was an important part of growing up in the country — not only did we see Easter Sunday as the most important Sunday in the life of the church, it was a time when we kids could take part in coloring Easter Eggs, and at the same time we heard stories of an even older time!  Here is the sequence of how we did our eggs:

First, on Good Friday Mama (Grandmother Polly Will Lytton) would boil several dozen eggs — sometimes 3 or 4 dozen depending on how many were at hand.  Once the eggs were boiled they were placed in colanders or pans — nestled into old cotton of some sort (old dish towels, clean rags of every kind) and ALWAYS with very clean hands — Mama did not want any oil or grease to spoil what would be the final product.  The pans of eggs were then put on the back screened porch to cool overnight — never into the icebox (or later the refrigerator) where if cooling too fast they would “sweat”.

On the Saturday before Easter, after supper, Mama would gather all the things needed to “spot eggs” — vinegar, suet, dyes, old woolen shirts or sweaters — she would have everything ready before she brought the eggs in from the porch.

//assets.pinterest.com/js/pinit.js

 With all us kids hovering around and Grandma Edna and Granddad Carson near by we would start (I can’t remember your Granddad Ty Cobb Lytton being involved at all — maybe he was doing final outside chores …or taking time to just sit aside and read the paper!)

This is how it would go:   Grandma had boiled some onion skins to make brown dye; Granddaddy would be standing by to mix the toxic black dye (kids not allowed to touch – it was cloth dye and it was toxic!); Mama would set old cups or those stained from previous Easter dye sessions around the table and carefully put the dye tablet, some vinegar, some hot water in each cup and each of us would take up a space around the table and try to stir and melt the tablet without spilling a drop (not always successful at that).  With that accomplished Mama would carefully put an egg in each cup and we would try to made sure that each egg was evenly colored.  Each colored egg was laid again in clean cotton cloth to completely dry and wait for “spotting.”  We kids of course would try to outdo each other in whose eggs came most perfectly out of the dye — not a quiet discussion.
When we were very young we would be sent off to bed to wait for Easter morning where we would find baskets of the decorated eggs — as we grew older and stopped believing in the Easter Bunny WE were allowed to help and this is how it went:

Once the eggs were cool and colored, Mama would melt the suet in a pan on the stove — this really was beef tallow that she saved from year to year —  from Easter to Easter — with very clean hands we would each take an egg and using our fingers — or for more intricate designs a straw from a REAL broom — and dip into the tallow and make spots of tallow all over the egg — or dip each end of the egg in tallow and put a design in tallow around the middle –or use a straw to make a design;  Mama ALWAYS took the green eggs and made a  wheat design [shafts of wheat, little tadpoles, crosses, bunny tracks, spiders] up and down the egg w/tallow using a broom straw   — Granddaddy used the black dye to make “baldies” by dipping each end of the egg in the tallow — then he would take a black egg and with a straw draw spiders all over the egg — somehow I cannot remember if we decorated Grandma’s onion skin dyed eggs –maybe we just admired them as brown — I’ll have to ask one of the “Lytton girls” about that …anyway  we could make any design we could manage — as you can imagine some of us had much more artistic talent then others!!

After the tallow hardened on the egg — and it hardened quickly on the porch-cooled eggs — and the older the tallow the more quickly it hardened — Mama would place the eggs in a bowl of water and apple vinegar where they would sit for a few minutes — then out she would take them and rub with the woolens she also kept from year to year — all the color would come off EXCEPT for that under the tallow — can you picture that?  Of course the tallow came off too but the color underneath did not and formed the design.

Preparing/decorating Easter Eggs in this way was always attributed to our Pennsylvania Dutch/German ancestors — I like to think of them as folk art — while those of the Ukraine are/were much more complex and sophisticated — I do not know of anyone who decorates eggs “our” way now — Some of us have tried  over the years — but the eggs are treated/coated when they come from the store – so you need straight from the hen — the dyes are much too harmless nowadays so the color won’t stick – and the tallow must be heated again and again to render it to the point when it will harden quickly –“
The eggs were a simpler version of traditional Dutch decorated eggs such as these.

//assets.pinterest.com/js/pinit.js

This process must’ve produced the most beautiful and unique eggs. I don’t think that I will ever actually be able to take these steps. The tallow and fresh eggs aren’t realistic ingredients for me to come by. But I do think it is important for this history to be written down and remembered. There is a lot of art lost in convenience, don’t you agree?

Crafts to Make with Hymnal Pages

//assets.pinterest.com/js/pinit.js

Yesterday I listed several vintage and antique hymnals in my Etsy shop, and I had a friend ask, “but what would someone do with an old hymnal…?”

Besides simply enjoying looking through it and being reminded of many of the traditional hymns that are no longer sung at church services, there are many wonderful ways you can repurpose them. In a way, repurposing will actually extend their “life.” Something like an old hymnal that may be worn thin and have no value to most people can be turned into things that will be used and treasured for years to come. Below are just a few of the neat crafts I found on Pinterest that use hymnal pages.

One of my favorites, Miss Mustard Seed used old hymnal pages on a lovely dresser:

Music Sheet Dresser....I would like to do this with some of the old hymnals I have
On AJ’s Trash to Treasure Blog, you can see that just about anything can get covered in hymnal pages, including lamp shades: 
10,7,10 CA projects110  SPECIAL HINT FOR LAMP SHADES:  Paper the INSIDE as well as the outside.  When the light shines through, all you seams and overlaps are OVERLY obvious.  By double layering your paper (one layer outside and one layer inside) it will minimize this.
The Picadilly Post turns hymnal pages in works of art:
I love this -- I think I would use the hymn 'The Old Rugged Cross' or 'In The Garden' or 'It Is Well With My Soul'...
Christmas ornaments seem like something doable even for the beginning crafter. These were found on Houzz
IDEA:  Hang on dining room window latches    in love with these diy cloth ornaments and color scheme for sun-room - all year
Use them to make a wreath. Here’s a How-To from HomeTalk:
A Hymnal Page Wreath :: Hometalk
Here’s an old blog post of mine where I used hymnal pages in a painting:
In my opinion the easiest and cheapest way to use hymnal pages is to simply frame them! In my home I have this framed song in our guest bedroom: 
Now let your imagination flow! 
Tips: You can link back to all sources. Hover in each introductory sentence to find the link.  If you are interested in purchasing one of the hymnals in my shop to use for a project or just to keep, go HERE. (Listed under “Books” on the left.) Depending on the day there’s usually 2 to 20 available. I’m happy to check a hymnal if you’re looking for a particular song, year, or church affiliation. 

//assets.pinterest.com/js/pinit.js

Barn Wood China Cabinet: Before & After

I like refinishing hutches. I have a whole folder on our hard drive dedicated to before and after pictures of hutches that we’ve done. They are straight forward, and they sell really well for us. (BONUS!)

So I don’t know why it is that we hate china cabinets. But both Ken and I do. Somehow those simple doors on the front that officially make it a “china cabinet” also turn it into a project from hell. I also have a folder dedicated to before & after pictures of china cabinets. I hope I don’t ever have to add another picture to it. I don’t want to say, “never” but, I never want to refinish another china cabinet again. Unless it’s free. And unless I’m doing it for myself.

Ugly, ugly!

Here’s the before of the latest china cabinet that we’ve redone. It was next to free because the glass shelves on the inside were gone. Buying it we knew we’d have to invest in the expense of replacing them, but we know a guy. 😉 Not really. We know Ace Hardware. They sell and cut glass.

Now, this is the point that I also have to point out the missing pane of glass on the right. I wish I could blame that on the kids. But that was an adult in the house. And not me.

The other pane came out and some chicken wire went in. Because chicken wire definitely goes with what we had planned for this.

Yesterday I posted about how we came upon the jackpot of barn wood. Check out that post (here). Before we even started on this china cabinet we knew that we wanted to add some of the barn wood to it and change the look completely. This is where I get on my soap box and proclaim, “Please do not throw out furniture. Find a way to reuse it. Invest in quality furniture to begin with and you will never need to replace it!”

Ahem, without further ado, the AFTER:

This took over a week to complete. Seriously, it did. With prepping, cutting wood, installing wood, drying wait time, painting, drying wait time, sanding, curing wait time, waxing, hardening wait time, installing chicken wire, and new glass shelves it was a FULL WORK WEEK. The wood is priceless. It cannot be replaced or replicated. This is a one of a kind, truly unique piece. And since I’m never making another one (never say never?), there is only one opportunity to get anything like it from us!

Now THAT’S a makeover! Completely different.

//assets.pinterest.com/js/pinit.jsHope you enjoy the before & after. If you’re local and you’re interested in purchasing this, please use the icons at the top to contact us. Facebook is the best way!

Update: This piece has sold and is no longer available,

Barn Wood: The wood that almost wasn’t.

The area we live in, a suburb of Atlanta, has changed a lot in the past 25 years. Like, a LOT. It’s not the same place it was when Ken and I grew up. There aren’t many open fields left. It’s mostly businesses and neighborhoods and concrete. And more people. And it wasn’t. Before.

Atlanta is known for having the native-born people far outnumbered by the transplants. But we’ve lived here our whole lives, and we know a lot of other people that have, too. So this story is for them. And us. But I have to start from the beginning:
Fort Daniel isn’t just the name of an elementary school in Gwinnett County, and Hog Mountain isn’t just the name of a road (or two). Fort Daniel was an actual military fort built in the late eighteenth and early nineteenth centuries on Hog Mountain, which was the southern boundary of the Native American hunting grounds.  This area is approximately located on Scenic Highway and in between Old Peachtree Road and Gravel Springs Road. The fort was rebuilt in 1814, but there is some speculation as to whether it was completely rebuilt from the ground up, or rebuilt using the existing structures. For our purposes, it just matters that it’s old.
Recently a barn-type structure located near our home was being demolished. A sign invited anyone that wanted to take whatever wood they liked. And so, being us, we started the process of removing wood.  During our visits there to load up our truck, we talked with the landowner, Mr. Boyce, a few times. He was having the structure removed so that his two sons could build their homes there. Someone was supposed to come demolish the building and haul it away, but those plans didn’t work out. And, it turns out, this wasn’t just a barn. Mr. Boyce bought the property 25+ years ago, and he was told that at some point in time someone had moved one of the old barracks from Fort Daniel there, and it had been used as a storage barn ever since.
Ken carefully removing pieces of wood from the structure. At one point he was balancing
on a rotten tree stump to get the perfect pieces for me.
This wood that we got, is, at youngest, from the early nineteenth century. Each piece of wood is stunning. On the sides that were exposed to the elements you can see the faint, original green color, places where a “newer” (which may be decades old, as well) whitewash color shows. Mostly there is the much sought-after silver gray color. On the back, the sides that were not exposed, the wood is rich and brown. It is a color that you can only get with time, and a lot of it. This color is enough to move you me emotionally.
This is my favorite piece of wood that we got. Isn’t it beautiful?! I’m saving it for something special.
We’ve taken some of the wood that we collected that weekend and added it to a china cabinet that we’ve customized. The wood looks weathered and beautiful, but don’t mistake it as fragile and brittle. This wood is rock hard and strong. It has lasted a very, very long time. This wood is our history. It’s special. And it was almost trash.
Here’s the china cabinet! I was trying to avoid my reflection, so you have to see it from an angle. 😉
Ready to be filled with special things!
Ahhh! THIS WOOD is a dream!
This piece is currently available and can be seen by appointment. Use the icons at the top of the page to contact us. 
~~~~~~~~~~~~~~~~~~~~~~~~~~~~~~~~~~~~~~~
To learn more about Fort Daniel, Georgia, visit these websites:

One for the Books

I have a love of books and reading that crosses over into my vintage/antique obsession. I devour a good book. A good series of books is truly dangerous. There may not be any clean clothes or meals served until the series is done. Sad, but simply true.

Sometimes I buy old books because it’s written by a well known author. Often I buy them because the title is interesting. I also buy them because of the color of the cover. I’ve mentioned a few times before in previous posts that I will walk through the house looking for a book of a certain color to add to a holiday vignette that I am working on. There’s something about the smell of old paper that makes an old book holy regardless of the subject matter. There’s something about looking through an old encyclopedia of “modern” knowledge that makes even a young person long for the days of simplicity and ignorance of old. How little we knew. How happy we were.

Rudyard Kipling is known around the world. This copy of his works shows the once innocent swastika symbol with Kipling’s name on the inside cover. In the Hindu culture of Kipling’s beloved India, this was a symbol of good luck and fortune. Once the Nazi party later began to use it, Kipling ordered that it no longer be used in any of his books. I wonder, one day in the future will people remember that this symbol was not always one of evil and hatred? If books like this are tossed and thrown away the chances of that being known may die with it.


Not quite as well known as Rudyard Kipling, but symbolic to my home of the metro Atlanta region is poet and storyteller Sidney Lanier. The lake nearest to my home and also our source of drinking water takes the name of Sidney Lanier. Many people are probably unaware of who he even was. This copy of his poems, edited by his wife, also happens to be signed by the author. Lanier was important enough in his day to have a major body of water named after him. Lovely, isn’t it, that a man was appreciated for his artistic abilities?


Here is a gathering of old hymnals, which is quite appropriate for an antique lover living in the Bible Belt. Imagine the souls that held these hymnals week after week, who sang out and praised God, that begged for his mercy, that felt his Holy Spirit. There’s something about holding an antique church hymnal that makes me feel electrified.

And here are just a few examples of books that I’ve chosen because of their color or title alone:

The great things about collecting old books is that they are incredibly easy to find. Buy what you personally like and you will be surrounded by some of your favorite things.

XOXO,
Abby//assets.pinterest.com/js/pinit.js