
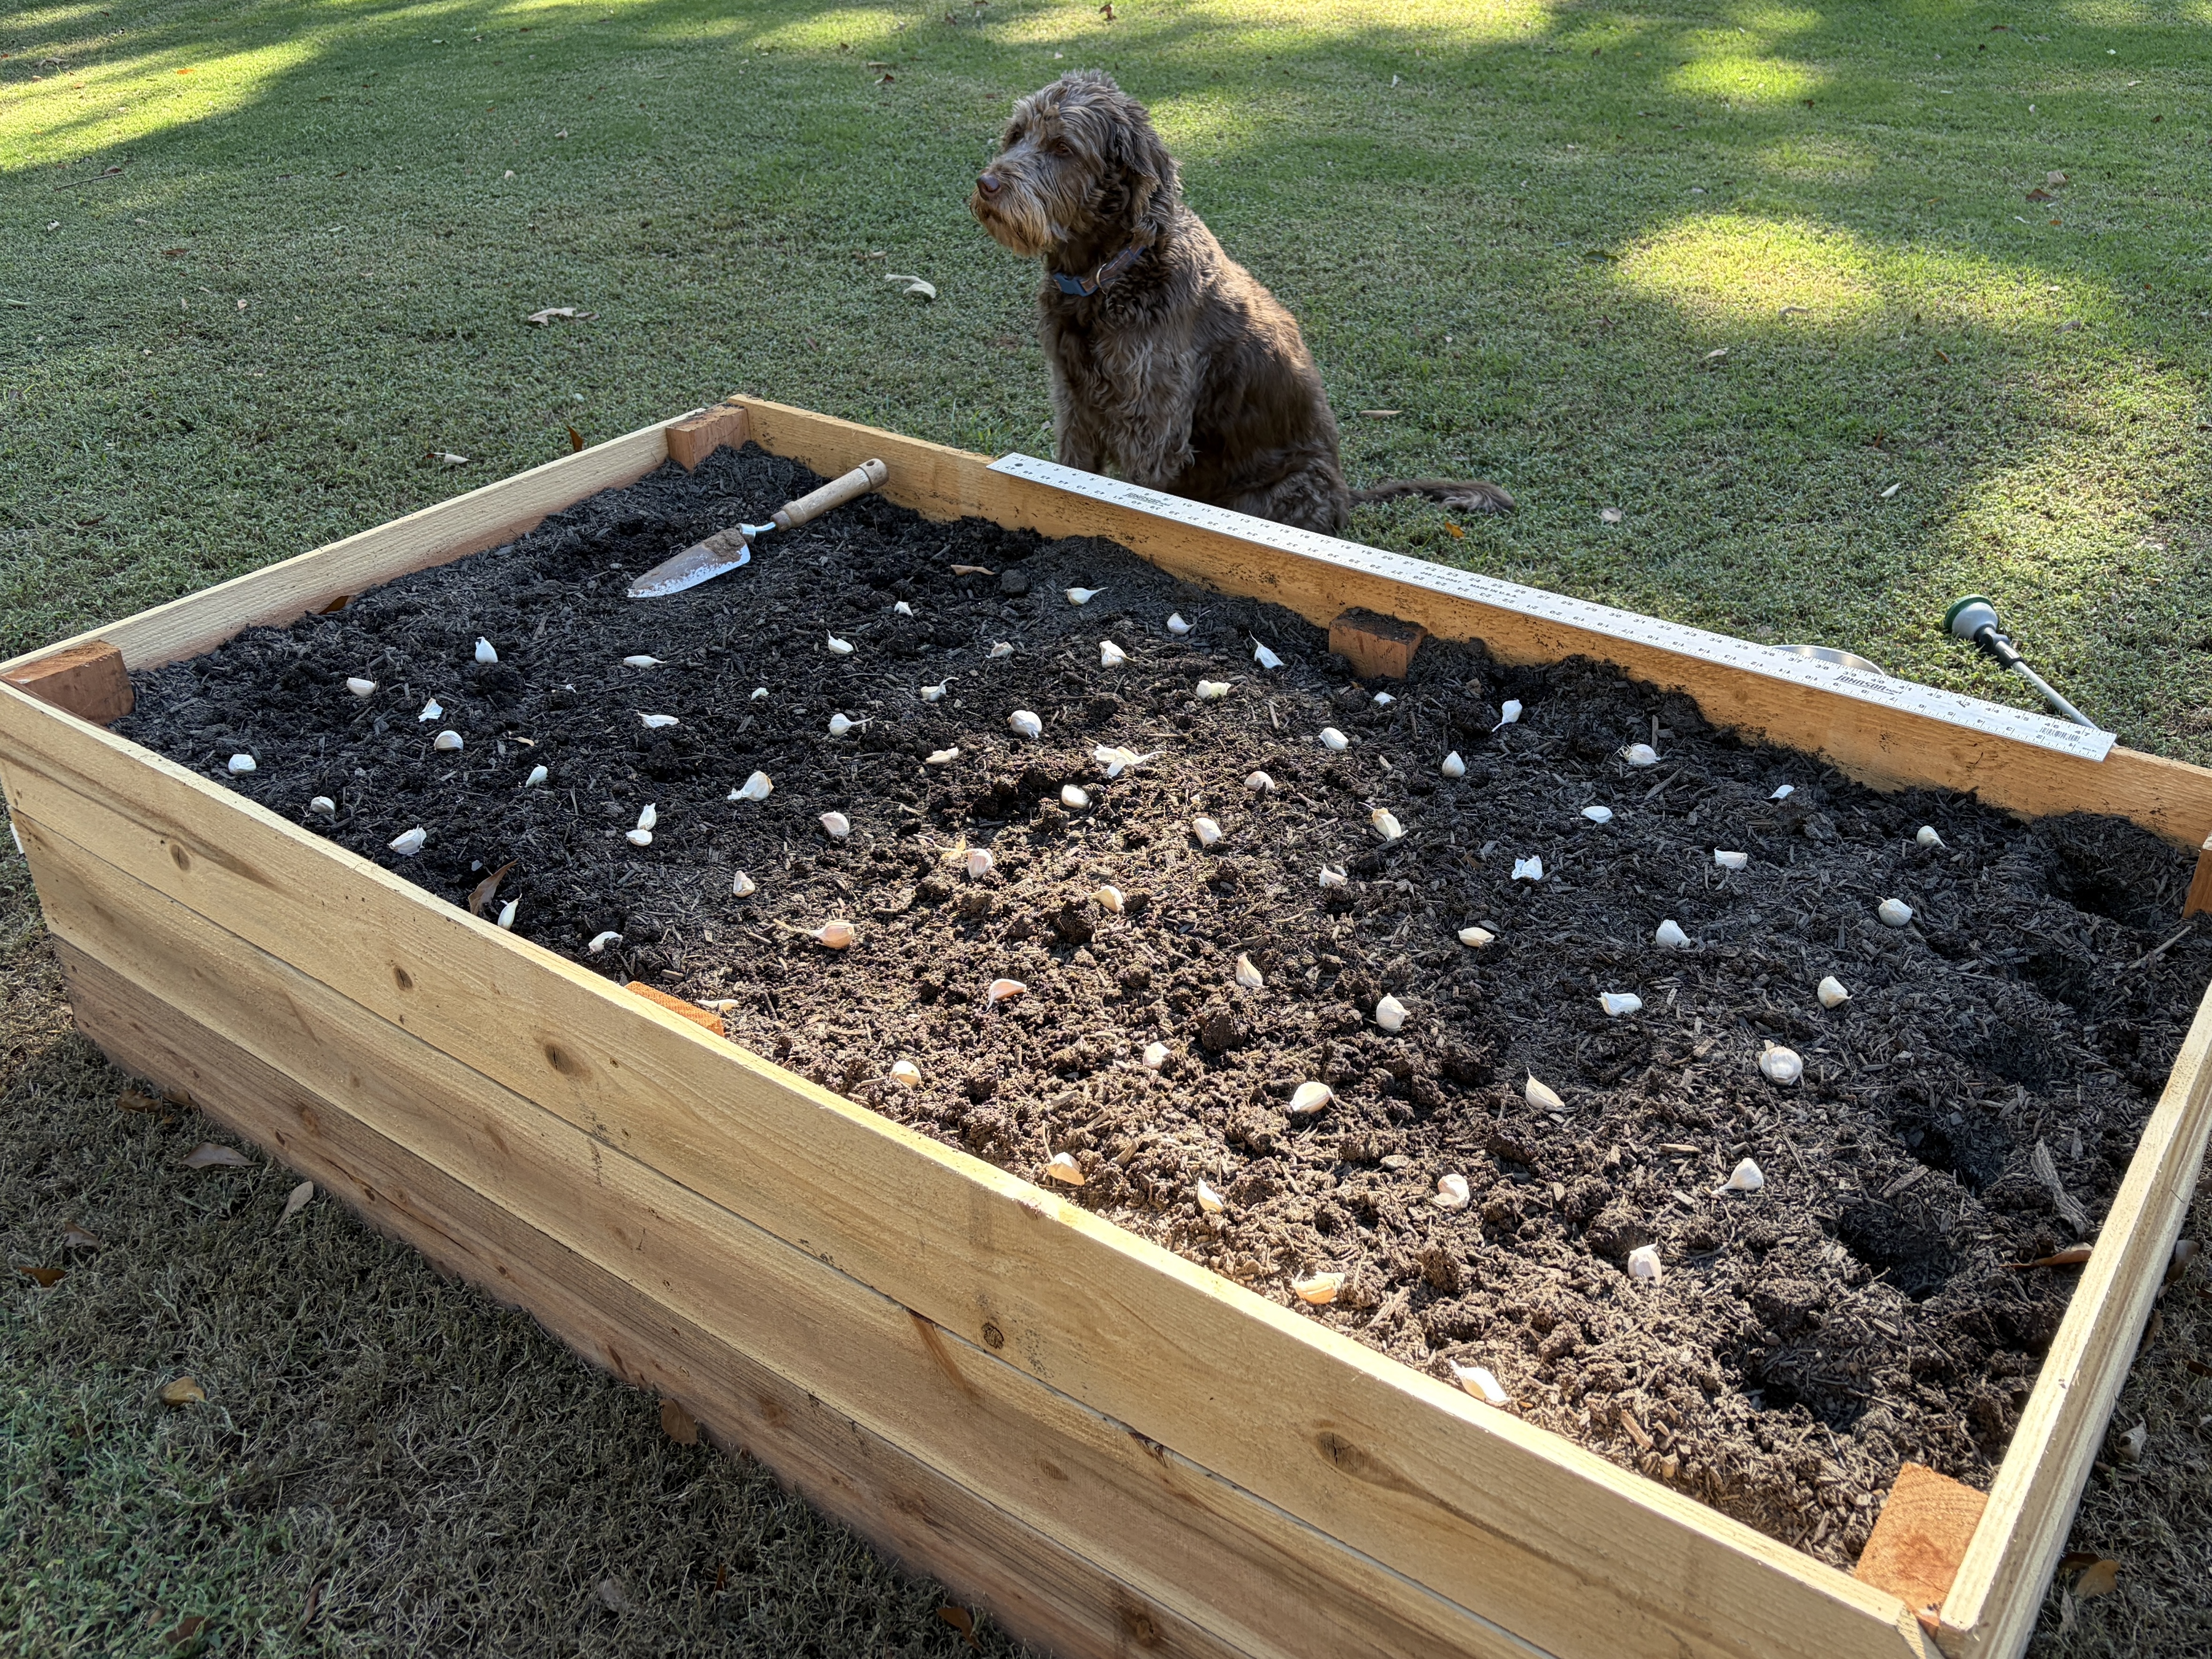
Raised garden bed with garlic cloves laid out for fall planting, a trowel, a ruler, and a brown dog sitting behind it. Learn how to plant garlic in the fall

How to Plant Garlic in the Fall in the South

Spend some time talking with experienced vegetable gardeners, and they’re likely to give you a similar piece of advice: only grow what you actually eat. After all, why bother to grow peas if no one in your household likes to eat them?

Nearly every global culture eats garlic in their cuisine. However, for some reason, most home gardeners don’t grow it. After talking with experienced gardeners in my area and researching the best ways to grow garlic in the South, I’m sharing some basic tips to plant and grow garlic this fall.

Learning how to grow garlic isn’t complicated. With a few guidelines, you can learn how to plant garlic in the fall.

This article contains affiliate links. If you purchase through these links, I may earn a commission at no additional cost to you. This article is not sponsored by any of the growers mentioned.

Why Grow Garlic in Your Garden

If you ask me about my vegetable garden plans in March, you’ll probably get a very enthusiastic response. After being cooped up inside over winter, I’m always eager to get the ball rolling for my spring and summer veggies.

On the other hand, if you came back and asked me about my garden again in August, I might sound a little burned out. Weeks of watering, controlling weeds and pests, and daily harvesting leave me more than ready for a break.

Since garlic planting arrives around the time when I’m tired of the garden chores, it’s a good thing that garlic isn’t as demanding as tomatoes or squash. After giving my garden beds a rest for a few weeks in early fall, I’m able to plant garlic and do a bit of basic tending until it’s ready to harvest the following summer.

Many gardeners consider garlic to be a low-maintenance plant. Beyond maintaining appropriate moisture level and applying a nitrogen fertilizer in the spring, it doesn’t require daily supervision.

Many of the bugs and animals that are attracted to our summer gardens find garlic to be undesirable. With fewer pest problems during the longest part of its growing season, it only requires intermittent checking to make sure the plants are healthy.

Garlic is a crop that can easily store for many months if it has been cured properly. This makes it an excellent crop to consider this fall. Before you start, the most important thing to know is which growing zone you’re in.

Growing Zones and Garlic Varieties

Garlic is planted in mid to late fall. It loves to grow in cold weather. In fact, garlic requires a process called vernalization to form the individual cloves of garlic within the bulb. It’s important to know how many days your area gets of cold weather below 40 degrees, which can be found by determining your growing zones. (To find your growing zone, click HERE.)

In addition to cold temperatures for vernalization, it’s good to know the number of daylight hours and air temperatures typical for your growing zone. Once you determine your growing zone, you’ll be able to decide which varieties of garlic to plant and when you should plant them.

Growing zones 3-7

Cooler growing zones often see the most success with hardneck varieties of garlic. Generally, garlic is planted about two weeks before the first frost dates in these zones, but gardeners should compare recommendations for specific varieties in their exact zone. Hardneck varieties of garlic grow hard stems that form scapes or flowers in warm weather. Hardneck garlic sometimes has a stronger, spicier flavor. After harvesting, it can usually be stored for 3-6 months.

Growing zones 8-10

Warmer climates usually grow softneck varieties of garlic but sometimes see favorable results with hardneck varieties as well. Planting times vary in these growing zones, with some as early as October, and others through mid-December. If you’re planning to grow garlic in these warmer zones, you’ll need to check if your growing zone requires steps for extra chilling time.

In contrast to hardneck varieties, softneck varieties of garlic have soft stems. Softneck garlic is often milder and sweeter. These are the varieties that you may have seen pictures of garlic bulbs braided together. After a proper curing time, softneck garlic can be stored for up to 12 months.

Two metal bowls containing separated garlic cloves, labeled Inchelium Red and Southern Selection softneck.
I purchased Inchelium Red and the Southern Selection softneck assortment from Southern Seed Garlic.

Whether you’re using hardneck or softneck garlic, you can order it online or purchase it from many reputable companies. This year I ordered from Southern Seed Garlic. Another option for seed garlic is Eden Brothers. Once you know your growing zone and which kind of garlic you’re going to plant, you’ll need to follow a few steps to get a healthy garlic harvest.

How to Plant Garlic in the Fall

I usually tend to be a rule breaker when it comes to gardening. However, when it comes to garlic, there are a few guidelines that are important when considering how to plant garlic in the fall.

Garlic cloves laid on the soil beside a ruler to measure spacing before planting.
  • Find the right garden spot – Garlic should be planted in well-draining soil with full-sun exposure. Choose a spot that won’t stay wet or dark throughout the day. Another consideration when selecting a spot is to avoid one that recently grew anything from the onion family, which may inhibit proper garlic growth.
  • Garlic takes several months to grow. Select an area of your garden that you won’t need for any other crops during that time.
  • Prepare your soil – Garlic prefers soil that drains well and allows it to properly form bulbs. If your soil is clay or compacted, consider amending it with loamy or composted material, which will help with drainage and nutrients.
  • When you’re ready to plant, gently separate your garlic bulb into individual cloves, but don’t remove the papery peel from the clove. Cloves should be planted with the root side down and the pointy end skyward. In general, garlic cloves do well being planted 6 inches apart and 1-3 inches deep. However, check your supplier’s recommendations for the varieties you’re planting.
  • Once your garlic cloves have sprouted, you can apply a loose layer of mulch around the sprouts, such as shredded leaves or pinestraw. Mulch will keep your soil temperature and moisture regulated, as well as preventing weeds.
  • Harvesting your garlic depends on your growing zone and the variety you’re growing. Your garlic is ready to harvest when one-third to one-half of the leaves have died back.
  • The final step to keeping garlic in your pantry for months to come is to cure it. Before adding newly harvested garlic to your pantry storage, leave it for two to three weeks in a warm, shady, ventilated place.
Illustration showing a garlic clove planted pointed tip up and root end down, with its papery covering left intact.

Why We Chose a Raised Bed for Garlic

When we added garlic to our garden, we decided it was best for our situation to use a raised bed. A raised garden bed can be an ideal way to grow garlic for several reasons.

Many areas of the South don’t have ideal soil for growing garlic. Soil with too much clay can prevent proper drainage and keep bulbs from correctly forming. Soil with too much sand may dry out too quickly. By using a raised bed, you’ll be able to control the quality of the soil and the moisture level for your garlic.

Since garlic can take several months to mature, we recently added a dedicated raised garden bed just for the garlic. We used a method called hügelkultur, which allows organic matter to gradually break down and enrich the soil.

Many gardeners choose to plant garlic directly in the ground. However, garden boxes can solve common problems gardeners experience when growing their own garlic.

If you’d like to learn how to easily and cheaply build your own raised garden boxes, check out our guide HERE.

Chances are that some of your favorite recipes call for fresh garlic. When you grow your own garlic, it’s simply a quick trip to the pantry, instead of a car ride to the grocery store.

With a little planning and a bit of patience, you can learn to grow your own garlic this fall.

Individual garlic cloves arranged across the soil surface in a wooden raised garden bed.
Lay out the cloves to check spacing before planting them at the recommended depth.

Check out these other reader favorites:

Raised garden bed with garlic cloves laid out for fall planting, a trowel, a ruler, and a brown dog sitting behind it. Learn how to plant garlic in the fall
Learn How to Build a Raised Garden Bed Cedar raised garden beds filled with vegetables, with mulched paths and arched wire trellises.

How to Build a Raised Garden Bed with Cedar Fence Pickets

Most people don’t think about starting a garden in October. When we look around at nature in the fall, we see dying leaves and flowers, plants going dormant to protect themselves from the cold, and fewer hours of daylight.

However, when I decided to plant garlic this fall, I realized I needed an additional garden bed dedicated to growing it for the next nine months. Many people have asked me over the years how to build a raised garden bed, and for the first time I’m sharing the simple process I use for building one.

If you’ve wanted to try gardening in raised beds, these steps will guide you through a straightforward, affordable way to begin. With this method, you’ll build a cedar raised bed that is approximately 3 feet wide by 6 feet long.

We’re using our new cedar raised bed for garlic plants, but you can use a bed like this to grow almost any kind of garden vegetable that is suitable for your growing zone.

This post contains affiliate links. If you make a purchase through one of these links, I may earn a commission at no additional cost to you.

Why Use Raised Garden Beds?

Raised beds aren’t a requirement for gardening in your yard. However, there are several reasons why many gardeners choose to use raised beds rather than planting directly in the ground.

The most common reason a gardener might choose to use a raised bed is because of the quality of their soil. In the South, some people struggle with red clay soil, which is known for poor drainage and restricting root growth. Other gardeners find that they have poor-quality soil, and using a raised bed allows them to improve the growing conditions by using the soil of their choice inside the beds.

We like the neatly manicured look that raised beds create in our garden. We can easily step through and around our beds without walking through dirt.

Regardless of whether you need raised beds for a specific reason, or you simply like the look of them, an important thing to consider is where to put them.

Where to Put a Raised Garden Bed

If you’ve decided to use raised beds for your garden, there are a few things to consider about where to place them.

Most vegetables and pollinator flowers like to grow in full sun. If you have an idea of what you’re going to grow, do a little research to see what kind of sun exposure you’ll need. In most cases, you’ll want to avoid using a spot that gets too much shade.

For the type of garden bed that you’ll find in this article, you’ll need a relatively flat spot. Our yard is already flat, so we didn’t need to do any preparation to the ground beforehand. However, if your yard is sloped or uneven, you will need to do some prep work to even it out first.

We like raised beds because they make gardening more convenient for us, so it’s important that you don’t place your garden bed in an inconvenient spot. Make sure that you can easily get to it with water and gardening tools.

If you’re using more than one raised bed, consider how to place them in relation to each other. Allow enough space to walk between them and to reach into them. Consider if you’ll need to have enough space to maneuver a wheelbarrow between garden beds. We spaced our raised garden beds 3 feet apart from each other and 3 feet away from the fence, which allows plenty of space for our needs.

Abby Smolarsky working with cedar fence pickets and a cordless driver while assembling a raised garden bed.

Why We Chose Cedar Fence Pickets

The internet is full of creative ideas for ways to build raised garden beds. In the past, we’ve used kits from the store, and one year we even used concrete blocks. We’ve seen other people who repurposed animal water troughs or corrugated metal for garden beds.

For our garden beds, we decided to use untreated, dog-ear cedar fence pickets. We chose these for several reasons. One reason we like to use these is because they’re similar to the wood used in many garden bed kits, but they’re more affordable.

Other benefits of using cedar fence pickets are that cedar is naturally resistant to decay and insects. Some people consider it safer for growing food than pressure-treated wood, and cedar is a lightweight wood that is easier to work with than other species.

We utilized the full six-foot length of the cedar fence pickets, and we did not cut off the dog-ear ends. The finished dimension of our boxes are 3 x 6 feet and 16 ½ inches high.

Combining the cedar fence pickets with one cedar 2x4x8 per bed, cost of wood ends up being around $55.73 per garden bed.

Materials and Tools for One Raised Garden Bed

You will need the following materials to build one raised garden bed:

Cut List

  • Leave six of the fence pickets uncut
  • Cut three of the fence pickets in half, approximately 3 feet long each
  • Cut the 2x4x8 into six even pieces, each approximately 16 inches long

How to Build a Raised Garden Bed

1. Measure and Cut the Wood

Set aside six cedar fence pickets for the two long sides. These will remain their full 6-foot length, including the dog-ear ends.

Measure and cut the remaining three pickets in half to create six approximately 3-foot boards for the short sides.

Cut the cedar 2×4 into six approximately 16-inch pieces, allowing for the small amount of wood removed by the saw blade. Four pieces will become corner supports, and two will support the middle of the long sides.

We used a circular saw, but a handsaw will also work.

2. Assemble the Two Short Sides

Lay three short boards on a flat surface with their long edges together, forming a panel approximately 3 feet wide and 16 ½ inches high.

Position a corner support at each end, with its broad face against the boards. Keep the supports aligned with the ends of the boards and just below the top edge.

Using 1 ⅝-inch wood deck screws, drive two screws through each board into each corner support. Each short board will have four screws, for a total of 12 screws per short side.

Repeat to assemble the second short side.

Inside corner supports joining three horizontal rows of cedar fence pickets in an empty raised bed.
The corner supports sit inside the bed, with the long-side pickets overlapping the short-side ends.

3. Assemble the Two Long Sides

Lay three full-length pickets on a flat surface with their long edges together. Position a support at the midpoint of the panel, with its broad face against the boards and just below the top edge.

Drive two screws through each picket into the middle support, using six screws for this step.

Repeat to assemble the second long side.

Top-down diagram showing a long-side picket overlapping a short-side end, with both screwed into an inside 2×4 support.
The support’s broad face meets the short side; its narrow face meets the long side.

4. Join the Sides to Complete the Bed

Stand the panels upright with all supports facing the inside of the bed. Position the long sides so their ends overlap the ends of the short boards.

Attach each long picket to the narrow face of each corner support using two screws at each end. Together with the two screws already securing it to the middle support, each long picket will have six screws.

Repeat at all four corners to complete the box. The finished bed measures approximately 3 feet by 6 feet and 16 ½ inches high.

Diagram showing placement and method to assemble a cedar raised garden bed.
Enlarge to show detail.

How We Filled Our Raised Garden Bed

Once you’ve built the box for your raised garden bed, you’re not quite ready to use it.

The internet is full of just as many opinions on how to fill a raised bed as there are ways to build one. We’ve come up with a method for filling a garden box that has resulted in healthy growth and productive harvests for our plants.

We like to use a hügelkultur-inspired method of filling a garden box. First, we lay down a layer of plain brown cardboard as a base to block existing grass and weeds. On top of the cardboard, we create a layer of old sticks, small tree limbs, and logs we gathered from our property. This is followed by a layer of old leaves, and the final layer is a mixture of garden soil and compost.

We ended up using six 2-cubic-foot bags of soil and one 1-cubic-foot bag of compost per garden box. If you use this method to fill your boxes, the amounts you use for each layer will depend on what you’re able to gather from your yard. We spent about $57.79 on dirt and compost per box.

Whether you’re learning how to build a raised garden bed out of necessity or because you simply like the look of them, the steps in this article provide a straightforward and affordable way to get started.


Check out these other reader favorites:

Learn How to Build a Raised Garden Bed Cedar raised garden beds filled with vegetables, with mulched paths and arched wire trellises.