
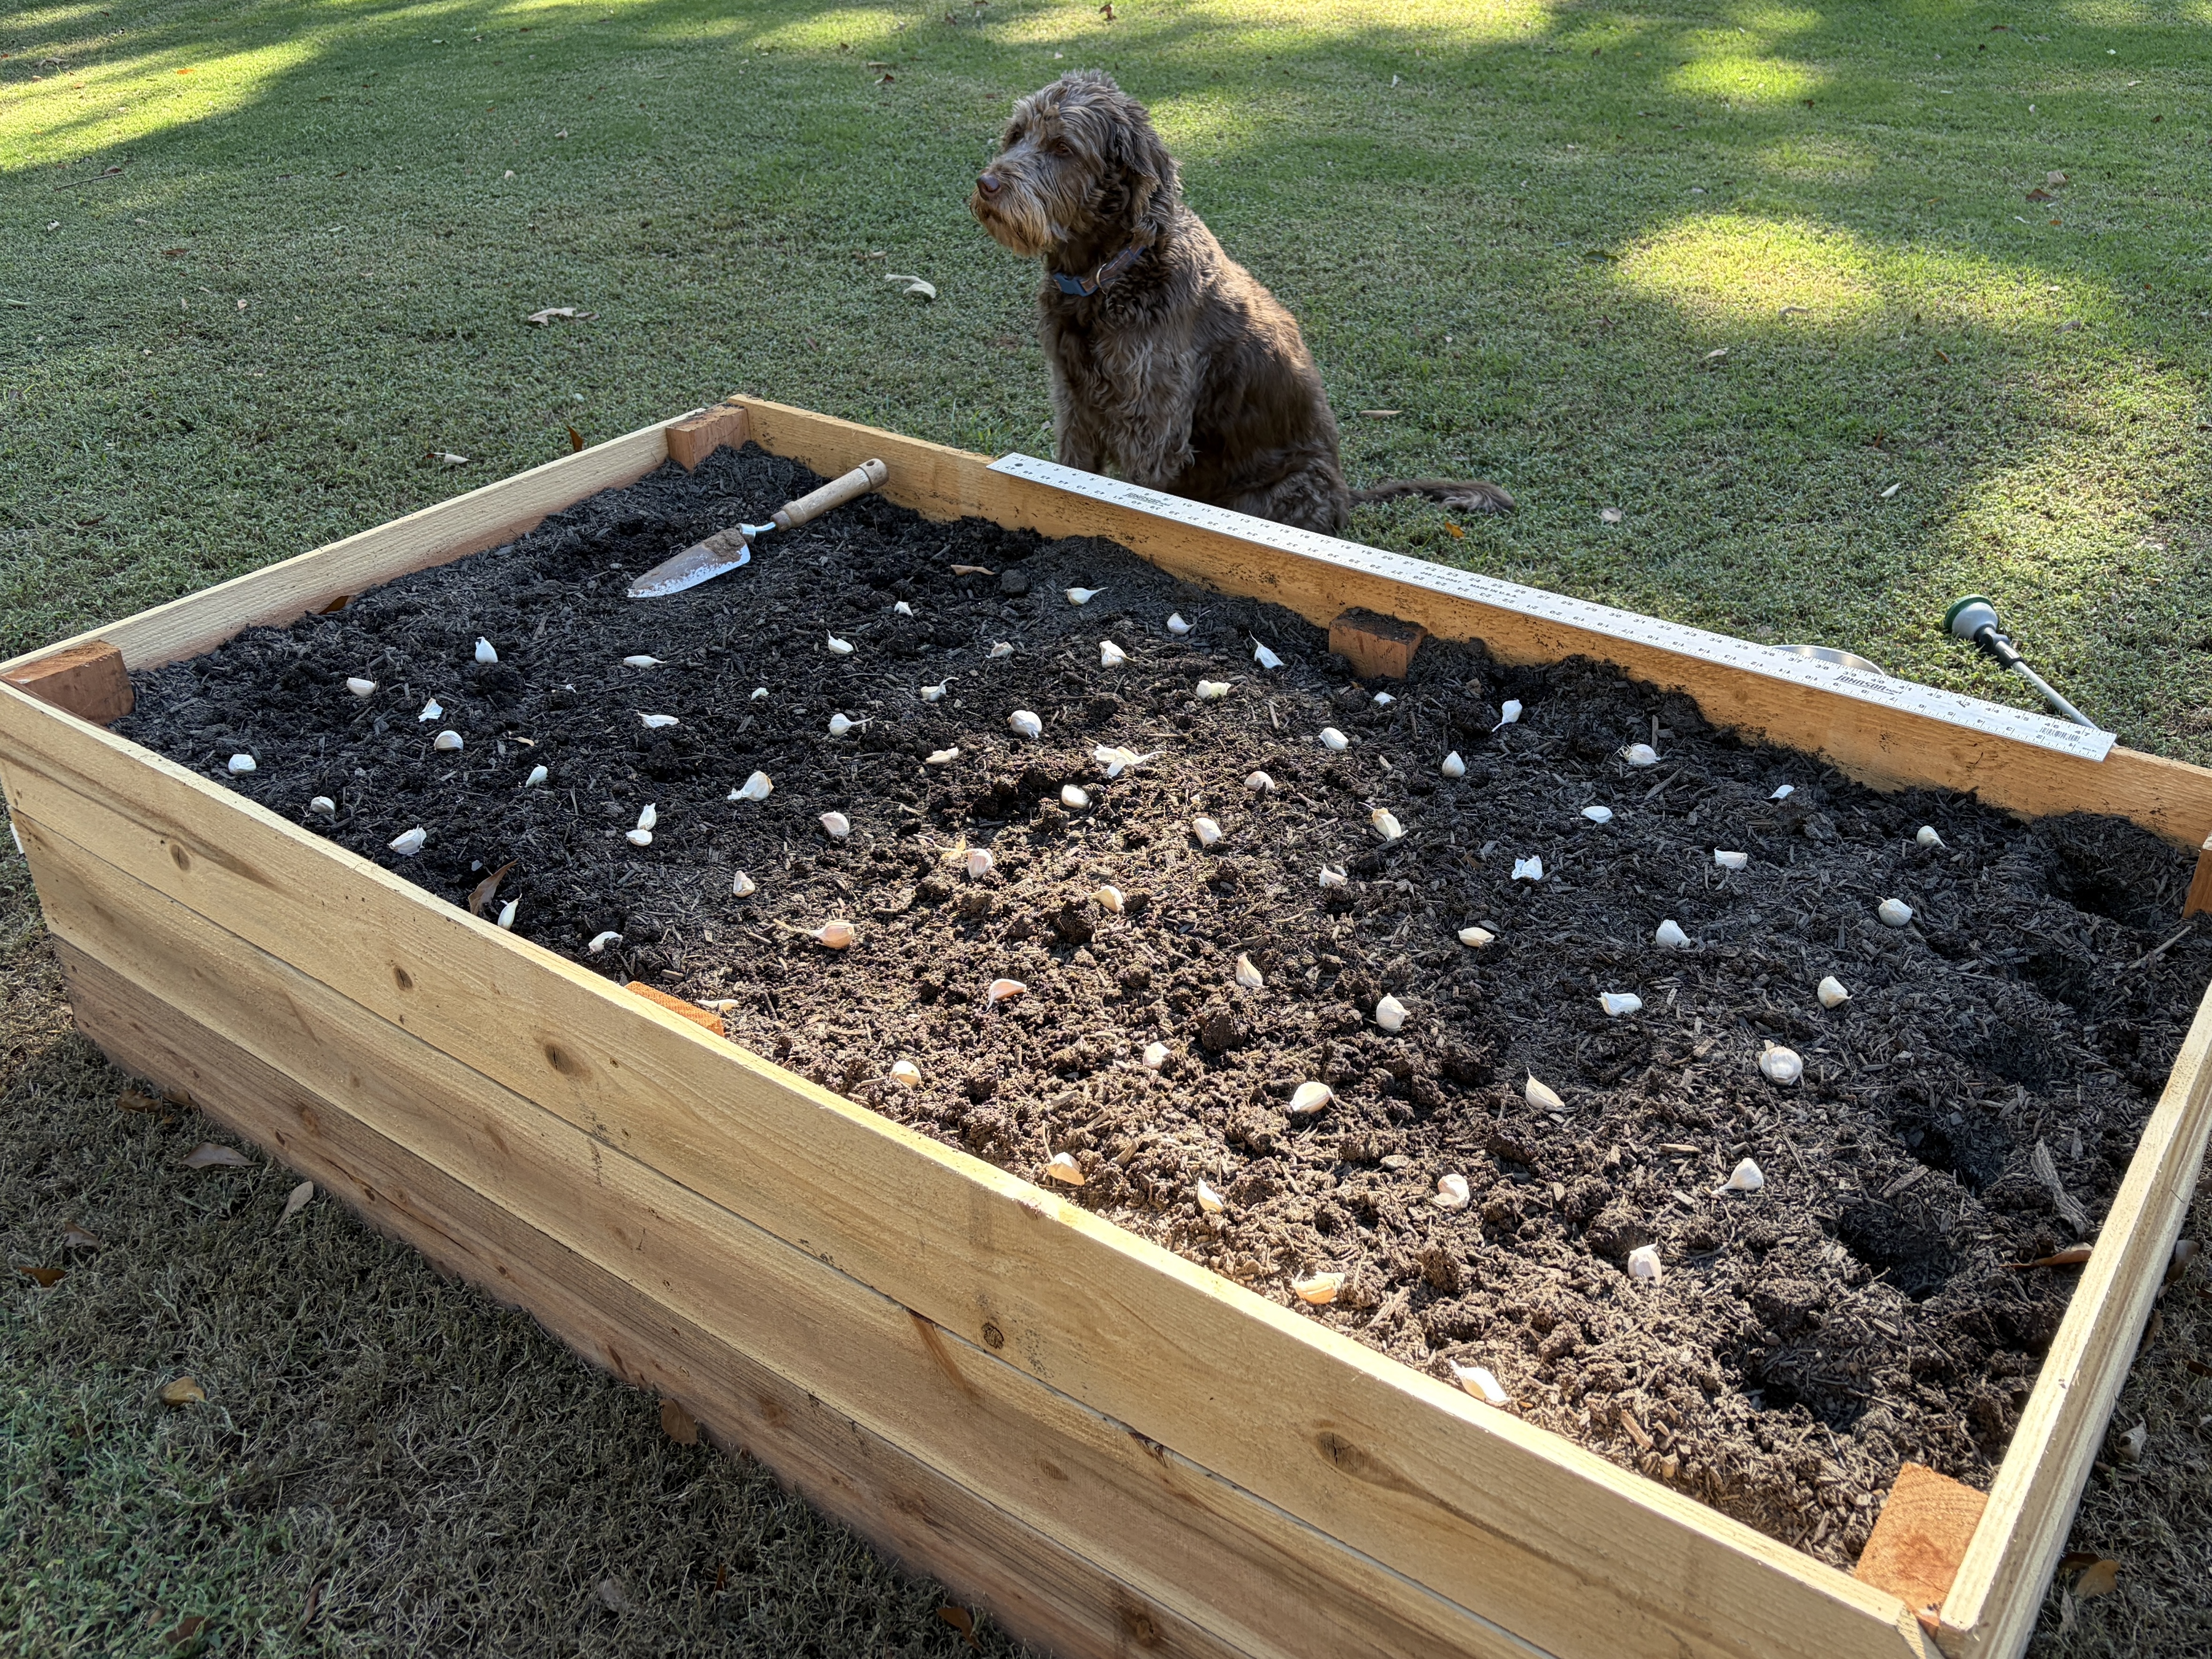
Raised garden bed with garlic cloves laid out for fall planting, a trowel, a ruler, and a brown dog sitting behind it. Learn how to plant garlic in the fall

How to Plant Garlic in the Fall in the South

Spend some time talking with experienced vegetable gardeners, and they’re likely to give you a similar piece of advice: only grow what you actually eat. After all, why bother to grow peas if no one in your household likes to eat them?

Nearly every global culture eats garlic in their cuisine. However, for some reason, most home gardeners don’t grow it. After talking with experienced gardeners in my area and researching the best ways to grow garlic in the South, I’m sharing some basic tips to plant and grow garlic this fall.

Learning how to grow garlic isn’t complicated. With a few guidelines, you can learn how to plant garlic in the fall.

This article contains affiliate links. If you purchase through these links, I may earn a commission at no additional cost to you. This article is not sponsored by any of the growers mentioned.

Why Grow Garlic in Your Garden

If you ask me about my vegetable garden plans in March, you’ll probably get a very enthusiastic response. After being cooped up inside over winter, I’m always eager to get the ball rolling for my spring and summer veggies.

On the other hand, if you came back and asked me about my garden again in August, I might sound a little burned out. Weeks of watering, controlling weeds and pests, and daily harvesting leave me more than ready for a break.

Since garlic planting arrives around the time when I’m tired of the garden chores, it’s a good thing that garlic isn’t as demanding as tomatoes or squash. After giving my garden beds a rest for a few weeks in early fall, I’m able to plant garlic and do a bit of basic tending until it’s ready to harvest the following summer.

Many gardeners consider garlic to be a low-maintenance plant. Beyond maintaining appropriate moisture level and applying a nitrogen fertilizer in the spring, it doesn’t require daily supervision.

Many of the bugs and animals that are attracted to our summer gardens find garlic to be undesirable. With fewer pest problems during the longest part of its growing season, it only requires intermittent checking to make sure the plants are healthy.

Garlic is a crop that can easily store for many months if it has been cured properly. This makes it an excellent crop to consider this fall. Before you start, the most important thing to know is which growing zone you’re in.

Growing Zones and Garlic Varieties

Garlic is planted in mid to late fall. It loves to grow in cold weather. In fact, garlic requires a process called vernalization to form the individual cloves of garlic within the bulb. It’s important to know how many days your area gets of cold weather below 40 degrees, which can be found by determining your growing zones. (To find your growing zone, click HERE.)

In addition to cold temperatures for vernalization, it’s good to know the number of daylight hours and air temperatures typical for your growing zone. Once you determine your growing zone, you’ll be able to decide which varieties of garlic to plant and when you should plant them.

Growing zones 3-7

Cooler growing zones often see the most success with hardneck varieties of garlic. Generally, garlic is planted about two weeks before the first frost dates in these zones, but gardeners should compare recommendations for specific varieties in their exact zone. Hardneck varieties of garlic grow hard stems that form scapes or flowers in warm weather. Hardneck garlic sometimes has a stronger, spicier flavor. After harvesting, it can usually be stored for 3-6 months.

Growing zones 8-10

Warmer climates usually grow softneck varieties of garlic but sometimes see favorable results with hardneck varieties as well. Planting times vary in these growing zones, with some as early as October, and others through mid-December. If you’re planning to grow garlic in these warmer zones, you’ll need to check if your growing zone requires steps for extra chilling time.

In contrast to hardneck varieties, softneck varieties of garlic have soft stems. Softneck garlic is often milder and sweeter. These are the varieties that you may have seen pictures of garlic bulbs braided together. After a proper curing time, softneck garlic can be stored for up to 12 months.

Two metal bowls containing separated garlic cloves, labeled Inchelium Red and Southern Selection softneck.
I purchased Inchelium Red and the Southern Selection softneck assortment from Southern Seed Garlic.

Whether you’re using hardneck or softneck garlic, you can order it online or purchase it from many reputable companies. This year I ordered from Southern Seed Garlic. Another option for seed garlic is Eden Brothers. Once you know your growing zone and which kind of garlic you’re going to plant, you’ll need to follow a few steps to get a healthy garlic harvest.

How to Plant Garlic in the Fall

I usually tend to be a rule breaker when it comes to gardening. However, when it comes to garlic, there are a few guidelines that are important when considering how to plant garlic in the fall.

Garlic cloves laid on the soil beside a ruler to measure spacing before planting.
  • Find the right garden spot – Garlic should be planted in well-draining soil with full-sun exposure. Choose a spot that won’t stay wet or dark throughout the day. Another consideration when selecting a spot is to avoid one that recently grew anything from the onion family, which may inhibit proper garlic growth.
  • Garlic takes several months to grow. Select an area of your garden that you won’t need for any other crops during that time.
  • Prepare your soil – Garlic prefers soil that drains well and allows it to properly form bulbs. If your soil is clay or compacted, consider amending it with loamy or composted material, which will help with drainage and nutrients.
  • When you’re ready to plant, gently separate your garlic bulb into individual cloves, but don’t remove the papery peel from the clove. Cloves should be planted with the root side down and the pointy end skyward. In general, garlic cloves do well being planted 6 inches apart and 1-3 inches deep. However, check your supplier’s recommendations for the varieties you’re planting.
  • Once your garlic cloves have sprouted, you can apply a loose layer of mulch around the sprouts, such as shredded leaves or pinestraw. Mulch will keep your soil temperature and moisture regulated, as well as preventing weeds.
  • Harvesting your garlic depends on your growing zone and the variety you’re growing. Your garlic is ready to harvest when one-third to one-half of the leaves have died back.
  • The final step to keeping garlic in your pantry for months to come is to cure it. Before adding newly harvested garlic to your pantry storage, leave it for two to three weeks in a warm, shady, ventilated place.
Illustration showing a garlic clove planted pointed tip up and root end down, with its papery covering left intact.

Why We Chose a Raised Bed for Garlic

When we added garlic to our garden, we decided it was best for our situation to use a raised bed. A raised garden bed can be an ideal way to grow garlic for several reasons.

Many areas of the South don’t have ideal soil for growing garlic. Soil with too much clay can prevent proper drainage and keep bulbs from correctly forming. Soil with too much sand may dry out too quickly. By using a raised bed, you’ll be able to control the quality of the soil and the moisture level for your garlic.

Since garlic can take several months to mature, we recently added a dedicated raised garden bed just for the garlic. We used a method called hügelkultur, which allows organic matter to gradually break down and enrich the soil.

Many gardeners choose to plant garlic directly in the ground. However, garden boxes can solve common problems gardeners experience when growing their own garlic.

If you’d like to learn how to easily and cheaply build your own raised garden boxes, check out our guide HERE.

Chances are that some of your favorite recipes call for fresh garlic. When you grow your own garlic, it’s simply a quick trip to the pantry, instead of a car ride to the grocery store.

With a little planning and a bit of patience, you can learn to grow your own garlic this fall.

Individual garlic cloves arranged across the soil surface in a wooden raised garden bed.
Lay out the cloves to check spacing before planting them at the recommended depth.

Check out these other reader favorites:

Raised garden bed with garlic cloves laid out for fall planting, a trowel, a ruler, and a brown dog sitting behind it. Learn how to plant garlic in the fall
fall garden prep: essential tasks for a beautiful start to spring belleantiquarian.com

Fall Garden Prep: Essential Tasks for a Beautiful Start to Spring

If you’re anything like me, fall garden prep is the last thing you want to think about right now. Gardening feels fresh and full of promise in spring and early summer, but somewhere near the end of September, my enthusiasm wanes.

It’s fall, and the daylight is growing shorter, which means I’m spending more time indoors. The air feels softer, and the garden smells faintly of drying leaves and damp soil. I can no longer see bright red tomatoes growing from my kitchen window. And there are no zinnias or cosmos ready to fill vases throughout our home.

This time of year, the Southern garden is quietly in the background asking for attention, while I neglect to give it a passing glance.

Welcome back to the newest installment of Home for the Holidays: A Southern Season of Charm. Today I’m talking about essential tasks for cultivating a healthy garden so that it’s ready for planting when spring arrives. If you’re just joining me from Google, Pinterest, LTK, or Instagram, I invite you to browse the other articles in this series, which can be found linked at the end of this article.

Note: This article contains affiliate links, which help support Belle Antiquarian at no extra cost to you.

Southern Timing: Why Fall Garden Prep Matters

In the South, gardening is often a year-round activity. There’s still plenty of time to grow many cooler weather crops. But for most gardeners, we are putting our garden beds to sleep for the winter. We’re preparing for the beginning of next year’s garden by performing essential fall garden prep.

It’s important to evaluate what your garden needs now in order to have a successful growing season next year. Now that the temperatures have cooled off a bit, it’s the perfect time to spend outside looking at your soil, cleaning tools, preventing diseases from spreading, and planning changes for the next year. It’s even a wonderful time to plant cool-weather crops like garlic and shallots.

If I wait too long to take care of my fall garden prep, the rush of holidays and gatherings will be here. Pretty soon, there will be Christmas cards to address, gifts to wrap, and cookies to bake. If the garden is going to be attended to, it needs to be now. It’s time to prepare the garden for spring.

Hand holding dried zinnia flower heads for seed saving during fall garden prep.
Zinnia blooms at the end of their season — drying beautifully for seed saving and next year’s planting.

Ornamental Garden Care: Peonies and Perennials

Fall is the ideal time to plant many flowering perennials, shrubs, and trees. Planting in the fall allows plants to establish their root systems. The plants won’t be injured or stressed from direct sunlight with high temperatures. The soil is still warm enough to encourage root growth, but less daylight and cooler temperatures prevent the plant from sprouting upwards.

If you’ve been following me for a while, you know that one of my favorite plants to grow is the peony. In the South, the best time to plant peonies is in the fall. Peonies grow from tuberous roots that prefer to settle into cool, well-drained soil. The best place to purchase peony tubers in the fall is from a reputable online retailer. Most big-box stores sell peonies in the spring, which is not their ideal planting time. If you’re looking for quality tubers, I’ve had good success ordering from Eden Brothers.

A few tips for planting peony tubers this fall:

  • Plant shallowly, with eyes no more than 1-2 inches deep.
  • Choose a sunny, well-drained spot.
  • Avoid disturbing roots once established.

If you already have peonies planted, fall is also time to perform routine care for them. Peonies are low maintenance plants, but they do need a little care to keep them healthy and happy.

Peony tubers labeled with garden tags for fall planting.
Peony tubers labeled with garden tags for fall planting. (We recommend copper tags.)

Here are a few recommended fall care tips for peonies:

  • Cut foliage to the ground after frost.
  • Remove debris to prevent fungal issues.
  • Mulch lightly, especially in exposed areas.

If you still have other types of blooms in the garden worth saving, such as hydrangeas, you might enjoy my article on Gathering Baskets & Dried Blooms. It shares simple ways to preserve flowers for use in arrangements and décor.

Pro Tip: When cutting back peonies, always clean your pruners between plants to prevent fungal spread. If you’re planning new roots, mark the spots now with tags like this; once spring foliage emerges, you’ll be glad you did.

Helpful Items:

Kitchen Garden Care: Rest, Mulch, and Plan Ahead

This year we had a successful kitchen garden with tomatoes, cucumbers, beans, squash, pumpkins, and peppers. The summer garden has finished growing, and now it’s time to take care of some essential tasks. I want to make sure next year’s garden is just as bountiful as this year’s was.

I begin by pulling out and removing any remaining plants and weeds. I’ll add compost or aged manure and mix it lightly into the soil. I’ll finish my garden beds off with a layer of leaves that I’ve raked up from the yard. The leaves will act as mulch to help prevent erosion and weeds.

Woman turning soil in raised garden bed during fall garden prep to mix in compost before winter.
Turning the soil to add compost before the raised beds rest for winter.

Now is the time to clean and store your garden tools. Your tools will last for years if you take a little time to oil wooden handles, clean blades, and sharpen edges before storing.

I also use this time to reflect on what worked this year, and what I may want to do differently in the future. I’ll order seed catalogs to peruse over the cold winter days when I’m dreaming of warmer weather. I’ll also start to map out and plan what I want to plant in the spring.

Pro Tip: You can reference an earlier article HERE that I shared on rotating crops in raised beds, one of the simplest ways to keep your garden soil healthy.

Helpful Items:

Fall garden prep checklist for Southern gardens showing essential tasks like mulching, pruning, and tool care — Belle Antiquarian seasonal guide.
A simple fall garden prep checklist for Southern gardeners — BelleAntiquarian.com

For a printable version of this checklist, click the button below.

When the work is done and the tools are set aside, there’s a calm that settles over the garden, a quiet knowing that everything is in its place.

Woman watering peas growing in raised beds during fall garden prep in a Southern garden.
Watering cool-weather peas, one of the easiest fall crops in the South.

Container & Porch Gardens

One last place that I want to give attention to in the gardens this fall will be the garden planters. I use my planters for annuals, and it’s getting too cold for the plants that have spent their summer bringing cheerful color to the porch and deck. I’ll use annuals like pansies, violas, and ornamental cabbage to give them a cool-weather refresh. Be sure to clean your planters and check for cracks before you use them again.

Spruce up your garden planters now so that by the time you host guests for the holidays, the plants have grown and filled in the pots. Take care of your planters now, and you’ll shorten your to-do list before guests arrive.

Autumn porch planter with pansies and ornamental cabbage for fall garden refresh.

Pro Tip: Before the first frost, water container plants deeply and group them together near a wall or porch corner. The shared warmth and protection help them weather sudden cold snaps.

Helpful Items:

A Ritual of Readiness

Fall and winter are slow seasons for gardeners. And thank goodness, because the holidays are filled with a hustle and bustle that can feel chaotic. Now is the perfect time to take care of your fall garden prep. It prevents small stresses from piling up when the holidays get busy. You’ll be happier and able to enjoy the festivities with those around you.

Just as we prepare our hearts and homes to welcome guests inside this holiday season, caring for your garden this fall can be seen in a similar way. When frost glistens on the garden beds, you’ll rest easily knowing your work is done. Your garden, like your heart, is ready for the season ahead. The garden can sleep soundly this winter, and so can you.

Home for the Holidays: A Southern Season of Charm

Be sure to check out these other reader favorites from the series! You can also subscribe here to make sure you never miss a new article.

Previous: How to Roast a Pie Pumpkin (Plus The Best Pumpkin Muffin Recipe)

Next: A Classic Sweet Potato Pie Recipe from a Vintage Southern Cookbook

For the full Home for the Holidays archive, go HERE.

10 Tools to Prep Your Fall Garden - shop these items
10 Tools to Prep Your Fall Garden – Click to shop these items.